In this guide
- Before you start
- 1. Open the files for the correct website
- 2. Rename the “plugins” folder
- 3. Sign in to WordPress and open “Installed Plugins”
- 4. Restore the folder’s original name
- 5. Check pending updates
- 6. Activate one plugin, check, then continue
- 7. If the website breaks again, stop at that plugin
- 8. You have narrowed it down: what next?
- Before considering the problem resolved
Your website displays “There has been a critical error” and you cannot access the dashboard either. If a plugin is causing the problem, you can try to regain access through your hosting control panel: temporarily rename one folder, then check your plugins one at a time.
This guide covers hPanel, Plesk and cPanel. Follow the route for your hosting provider.
You do not need to write code. You do need to follow the steps in order and check the result before moving on. This method helps investigate a possible plugin problem; a critical error can have other causes.
Before you start
Have your hosting login—the account with the company that stores your website—and your WordPress administrator login ready. These are separate accounts.
Check that your host has a recoverable backup of both the files and the database. If you are unsure, ask for help before making changes. Save the error message and, if possible, a list of the plugins that were active.
During the test, plugins will temporarily stop working. This may affect the design, forms, shop and any security features they provide. Complete the steps together rather than leaving the site halfway through. If the website takes orders or bookings and you cannot interrupt it, ask your host to help plan the work.
1. Open the files for the correct website
Sign in to your hosting control panel and look for File Manager. It works much like the file browser on your computer.
Choose your panel below; you do not need to follow all three routes. The hosting screenshots use the real Spanish interface, so the instructions also give the Spanish labels shown in them.
Hostinger: hPanel
Open Websites, find your site and select Manage website. In its dashboard, open Files → File Manager. If you can choose between this website’s files and all the hosting account’s files, choose this website.
Look for public_html and open it.
Plesk
Go to Websites & Domains, find your domain and open Files or File Manager. The website folder is usually called httpdocs.
cPanel
Open Files → File Manager. The main website is usually in public_html. If you have several domains, check which folder belongs to the affected domain; they may use different folders.
Check that you have found WordPress
The installation folder should contain these three folders:
wp-adminwp-contentwp-includes
If WordPress is installed in a subfolder, open that first. If you cannot identify the correct folder, stop and ask your host. Do not choose a folder simply because its name resembles your domain.
2. Rename the “plugins” folder
Open wp-content. Select only the plugins folder and look for Rename. It may be in the toolbar or the folder’s action menu.
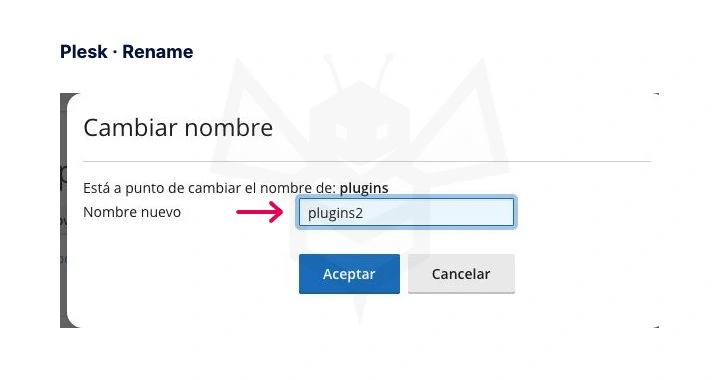
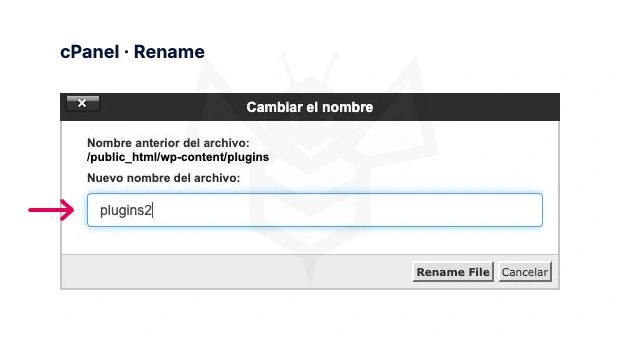
The new name is plugins2. The screenshots show it entered in the real field, before confirmation.
Choose your panel: hPanel · Plesk · cPanel. Follow just one option.
In hPanel
Right-click plugins and choose Rename—Cambiar nombre in the screenshot. Type plugins2 directly in the folder tree and press Enter.
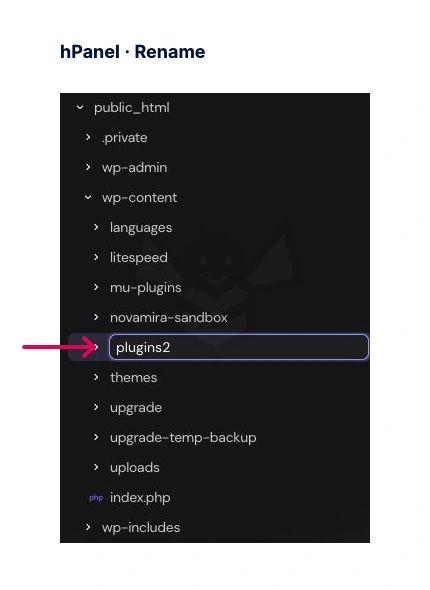
In the hPanel interface tested, renaming a folder took effect when Enter was pressed; the “Deploy” button was not needed. Do not deploy unrelated pending changes to complete this step.
In Plesk
Open the Actions menu for plugins and choose Rename. In the screenshot, the labels are Acciones, Cambiar nombre and Nombre nuevo. Enter plugins2 as the new name and confirm with OK—Aceptar in the screenshot.
In cPanel
Select plugins and click Rename—Cambiar el nombre in the screenshot. Enter plugins2 in the new filename field, labelled Nuevo nombre del archivo in this example. Confirm with Rename File.
Check the change and continue
The result should be:
| Before | During the test |
|---|---|
wp-content/plugins |
wp-content/plugins2 |
Change the name only. Do not delete or move the folder, and do not rename wp-content. If plugins2 already exists, choose another unused name such as plugins3 and write it down.
Check that the folder tree or list shows plugins2, then continue to step 3. The remaining steps are the same for all three panels.
Leave the file manager tab open: you will return to it in step 4.
3. Sign in to WordPress and open “Installed Plugins”
Leave the folder with its temporary name. In another tab, sign in to WordPress using your usual address.
Go to Plugins → Installed Plugins. With a standard installation, you can open https://your-domain.com/wp-admin/plugins.php, replacing your-domain.com with your domain. Keep any WordPress subfolder in the address too.
Opening this screen triggers red notices for previously active plugins whose files WordPress can no longer find. This is expected at this stage: the files are still inside the renamed folder.
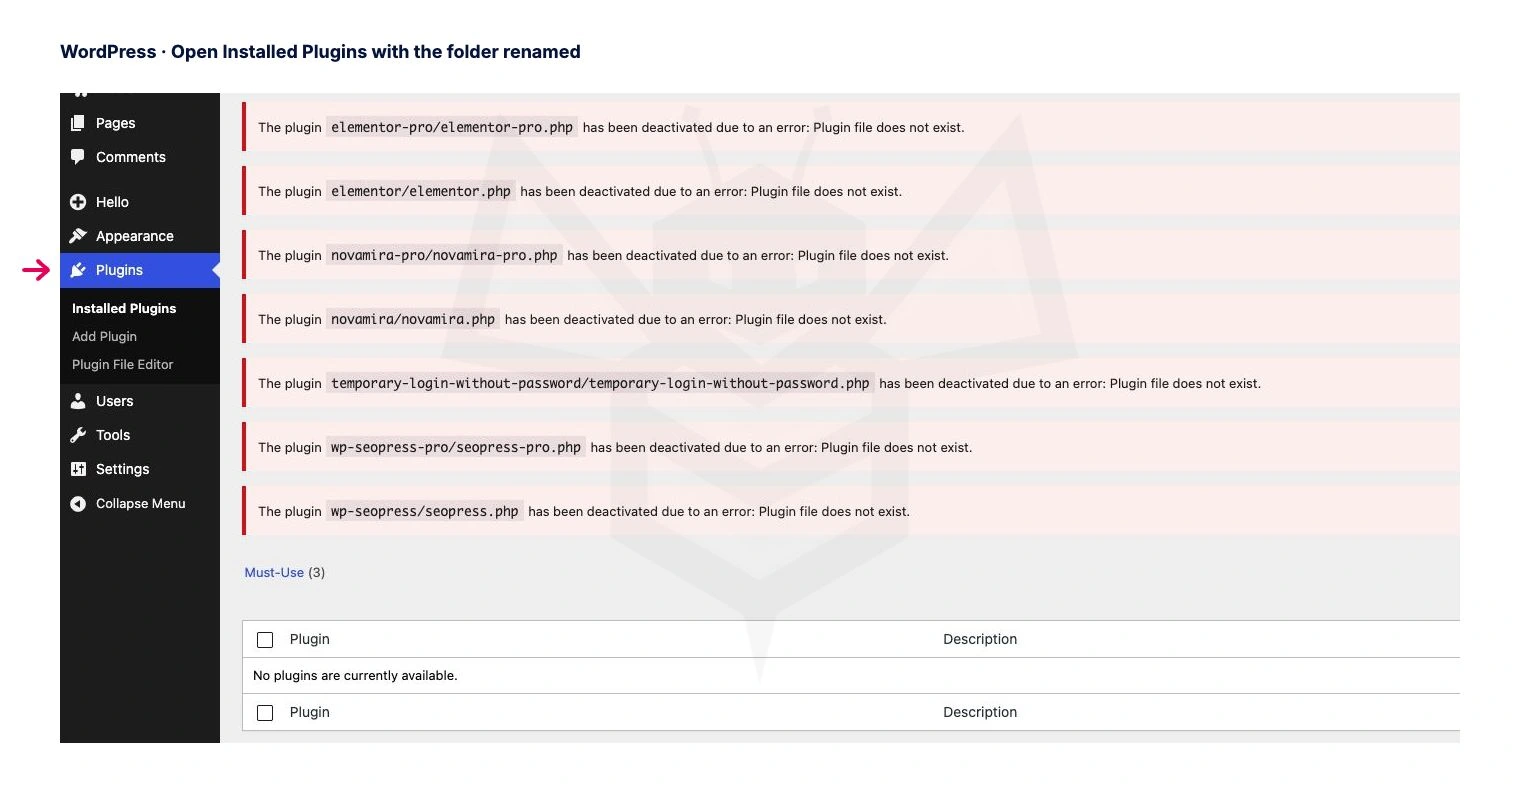
This genuine test-site screenshot shows the seven plugins that were active. WordPress displays a red notice for each, followed by a message that no plugins are available. Their files remain in the renamed folder. Plugins that were already inactive do not necessarily produce a notice.
Opening the dashboard alone is not enough. Visit “Installed Plugins” before continuing: this screen lets WordPress record the deactivation. The official recovery instructions specify this order. WordPress reference.
If the error still prevents access, do not keep renaming things. Contact your host and explain which folder you renamed. The problem may involve the theme, server or components that this method does not deactivate.
4. Restore the folder’s original name
Return to the file manager and rename plugins2 back to plugins, exactly as written, in lowercase. If you used a different temporary name, rename that same folder.
If another folder called plugins already exists, do not overwrite or merge them. Ask for help to establish what happened.
Return to WordPress and reload Installed Plugins. The plugins should reappear, inactive. Do not activate them all at once.
5. Check pending updates
With a recoverable backup confirmed, update plugins that show an available update. Do this one at a time, waiting for confirmation before proceeding. Keep the plugins inactive while completing this step.
If a paid plugin does not offer an update or reports a licence error, make a note and contact its supplier. Some plugins need to be loaded to offer updates; do not activate one blindly or download a copy from an unknown website. Managing WordPress plugins.
6. Activate one plugin, check, then continue
Keep two tabs open: Installed Plugins and the website your visitors see. Restore only the plugins you used before the error.
Start with plugins that others depend on: Elementor before Elementor Pro, or WooCommerce before its extensions. If WordPress says a required plugin is missing, activate that plugin first.
- Click Activate under the first plugin’s name. Do not select several checkboxes or use bulk activation.
- Switch to the website tab and reload the homepage. Also check an inner page and the area where the problem occurred.
- Try the action that failed: for example, opening the editor if the error occurred while editing. You do not need to place real orders or bookings for this check.
- Return to WordPress and check that the dashboard still opens.
- If everything responds, note the result and activate the next plugin. Repeat the checks after every activation.
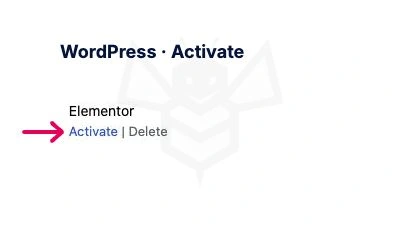
If activating a plugin opens its settings page, return to Installed Plugins to continue. You do not need to change those settings for this test.
The website may look incomplete while plugins are inactive. That does not necessarily mean it has broken: you are checking whether the same error returns. A private browsing window helps avoid old browser content, although your host may also keep its own cache.
Keep a simple note: “Plugin A: OK. Plugin B: OK. Activating C: error returns.” If you activate several at once, you will not know which activation triggered the problem. Checking plugin conflicts.
7. If the website breaks again, stop at that plugin
Do not activate anything else. Note the last plugin’s name and save the error message or a screenshot.
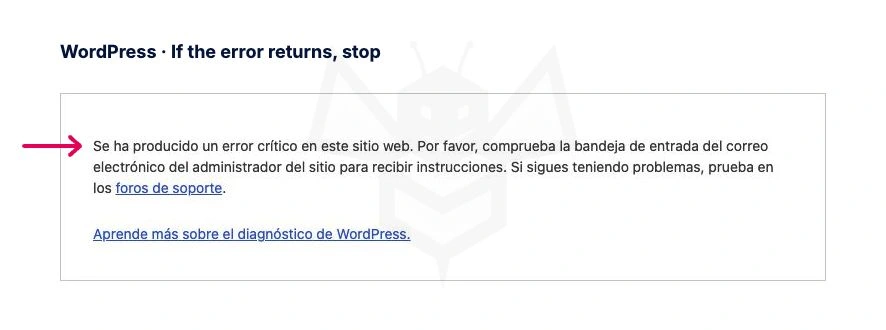
This error was reproduced with two test plugins. The original Spanish message says there has been a critical error on the website.
If you can still access WordPress: return to Installed Plugins, click Deactivate under that plugin and reload the website. If it recovers, leave the plugin inactive.
If you cannot access WordPress either: repeat steps 2, 3 and 4, in that order: plugins → plugins2, visit Installed Plugins, then restore the name plugins. Reactivate the plugins you already checked, one at a time, leaving the suspect inactive.
You have identified the activation that triggers the error. That is a useful clue, but the plugin may be conflicting with another plugin or the theme. It does not necessarily mean it is faulty on its own. Understanding a plugin conflict.
If all plugins work again and the error does not return, do not name a culprit without evidence. Record any updates and check the action that originally failed again.
8. You have narrowed it down: what next?
Leave it inactive and preserve its data
Do not delete the plugin or repeatedly activate it hoping it will work this time. If it handles payments, forms, bookings or security, ask for help to restore that function promptly. A working homepage does not prove that the function is available.
Check versions with support
In Installed Plugins, note the plugin’s name and version. Check whether an official update addresses the problem and is compatible with your WordPress installation, theme and required plugins. For example, a product’s free and Pro editions must be compatible with each other.
If an update is needed, keep a recoverable backup and, where possible, test on a staging copy first. Then repeat the activation and the same checks. If your licence does not provide the update, contact your supplier; do not download another copy from just any website. Elementor compatibility and troubleshooting.
Look up PHP; do not change versions blindly
PHP is part of the hosting software that runs WordPress. An incompatible version can cause errors, but changing PHP does not solve every conflict.
To check your version, open Tools → Site Health → Info → Server and look for PHP version. This screen only displays information; it does not change the version.
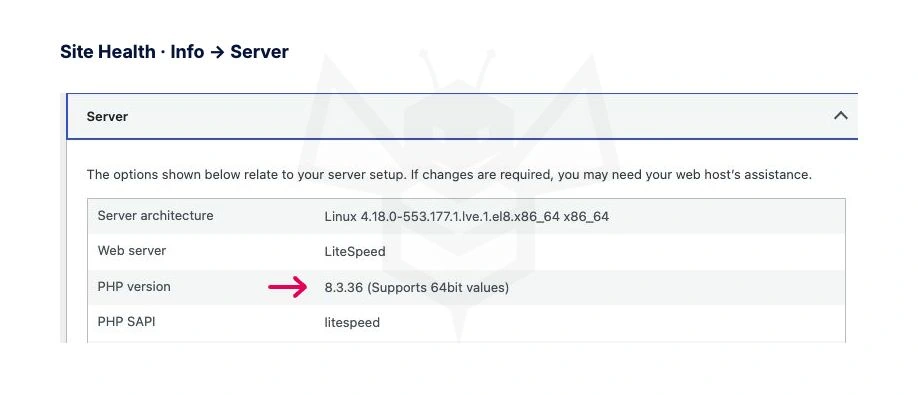
Give this information to your host and the plugin’s support provider. Ask them to confirm which compatible, supported PHP version your website needs. If they recommend a change, ask them to prepare a backup, test it and be ready to roll back. Do not simply select the highest version or try an old one. Site Health information.
If it still fails, ask for the specific error to be checked
Your host can inspect the error log, which records more detail about what happened. You do not need to edit files or understand code: provide the approximate time and the plugin you had just activated.
This detail helps support decide whether the plugin needs a fix, a compatibility adjustment or a replacement. If they confirm a conflict between two plugins, both developers should be informed. Avoid installing several alternatives at once or restoring an old backup without checking which recent content or orders would be lost. Common WordPress errors.
Before considering the problem resolved
Check that the folder is called plugins again, that you can access the dashboard, and that the homepage and important pages load. Also check the functions your site needs: forms, shop, bookings or editor.
If you left a plugin inactive, its function still needs to be restored. Regaining access is the first result; checking the whole website comes next.
If you need help, send these details
My website shows an error when I activate [plugin and version]. I had already activated [other plugins] and it was working. With [plugin] inactive, the website [recovers / still fails]. It happened around [date and time]. The message is: [error text]. I use WordPress [version], the [name] theme and PHP [version, if available]. The folder is called
pluginsagain / still has the name [current name]. Could you check the compatibility and the error details?
Do not include passwords. If you could not complete a step, say so.
This procedure is intended for a standard WordPress installation. Multisite networks, must-use plugins and custom folder structures require their configuration to be checked before following a general procedure.