
Notion is designed to be highly collaborative, so there are several ways to share the content you create with others. Permission levels ensure that they access this content exactly the way you want them to.
[mepr-show rules=”7898″ unauth=”message”]
[/mepr-show]
Ways to Share
There are several different ways to share the pages and databases you create in Notion with people inside and outside your workspace. Below is an overview of all the ways to share.
Share Menu
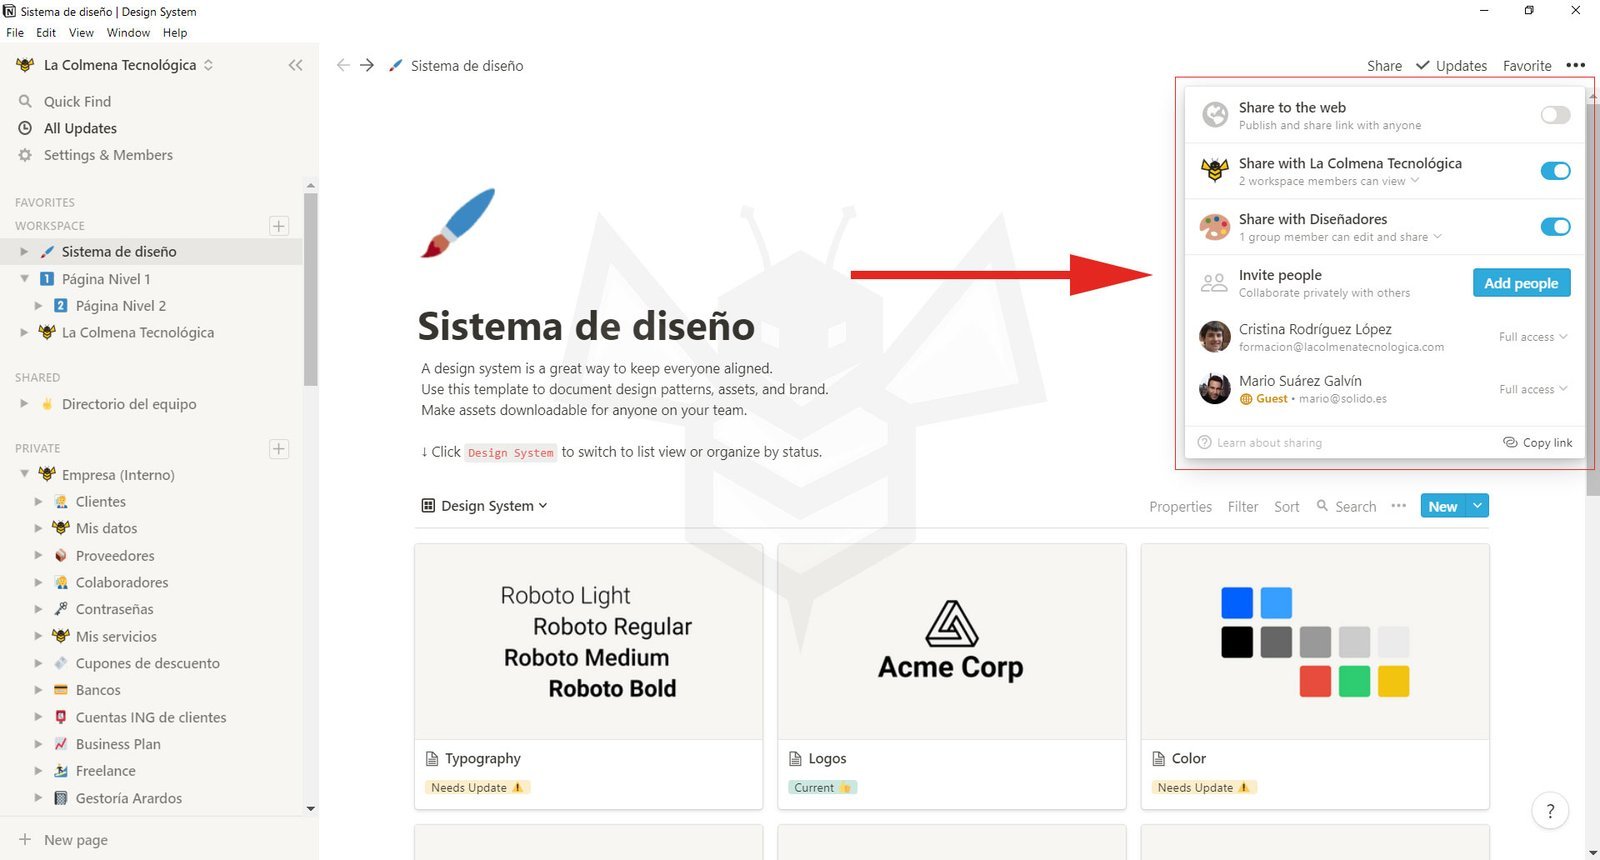
First, let’s take a quick tour of the Share (Share) menu, which you can click in the top right of any of your pages. On mobile devices, click the share icon next to ••• in the top right to see the same options.
[mepr-show rules=”7898″ unauth=”message”]
[/mepr-show]
- Each row in this menu represents a different person or group of people with whom you can share the page. In the menu above:
Share to the web(Share to web) means anyone with the link can access the page without needing a Notion account.Share with La Colmena Tecnológica(Share with La Colmena Tecnológica) means all members in the workspace can view the page.Share with Diseñadores(Share with Designers) is an example of a permissions group. In the example above, the entire workspace can view the page, but only designers can edit the page.Cristina Rodríguez Lópezis an example of a team member with full access to the page. They will be able to make modifications and invite more people.Mario Suárez Galvínis an example of a guest on the page who was invited from outside the workspace.
[mepr-show rules=”7898″ unauth=”message”]
[/mepr-show]
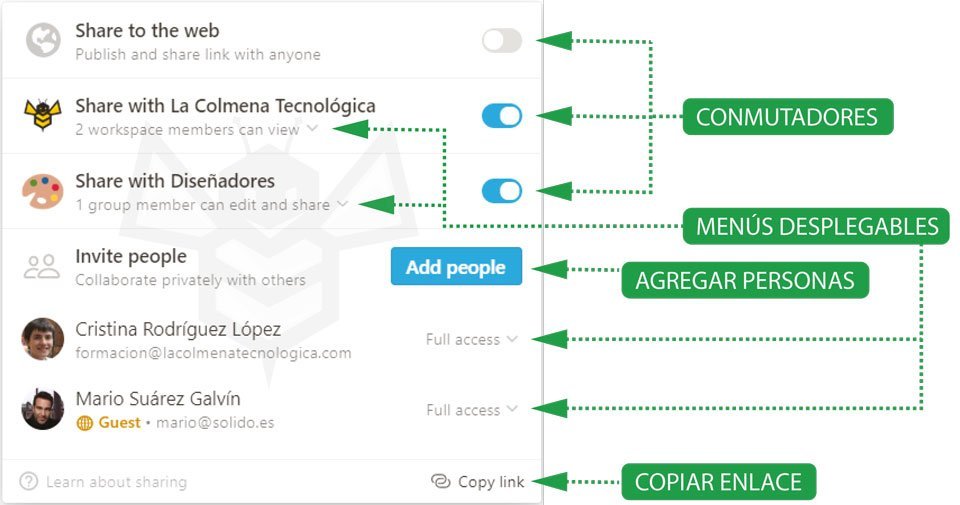
- The toggles on the right enable and disable access for each group.
- The dropdown menus allow you to set their access level.
Copy link(Copy link) copies the page’s unique URL to your clipboard so you can share it with anyone you want. Still, only people with access to the page can view it.Add people(Add people) allows you to add people both inside and outside your workspace to a page using their email address.- External people will be added as guests.
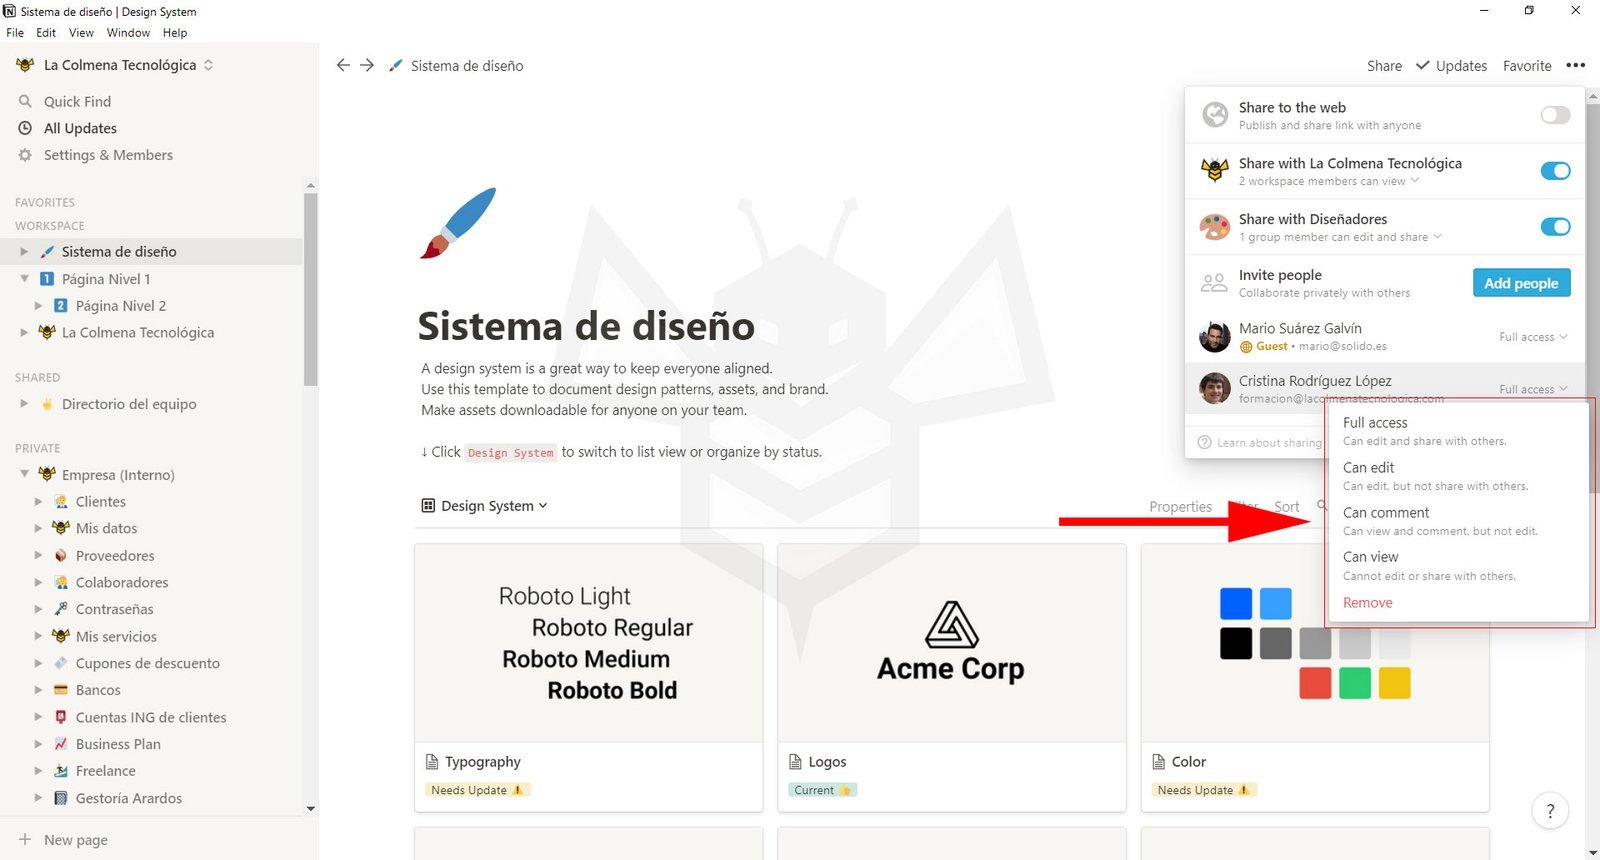
- You can assign both guests and other workspace members an access level using the dropdown menus:
[mepr-show rules=”7898″ unauth=”message”]
[/mepr-show]
Share with Your Team
You can collaborate with others in Notion by adding them as members to your workspace (Team and Enterprise plans only). These can be your teammates at work, friends, or anyone you want to work with on pages. There are a few ways to share Notion pages with other members so you can work together:
[mepr-show rules=”7898″ unauth=”message”]
- Any page in the
WORKSPACE(Workspace) section of the sidebar is shared with all workspace members. - You can drag a page from
SHARED(Shared) orPRIVATE(Private) in your sidebar to theWORKSPACE(Workspace) to share it. - In the
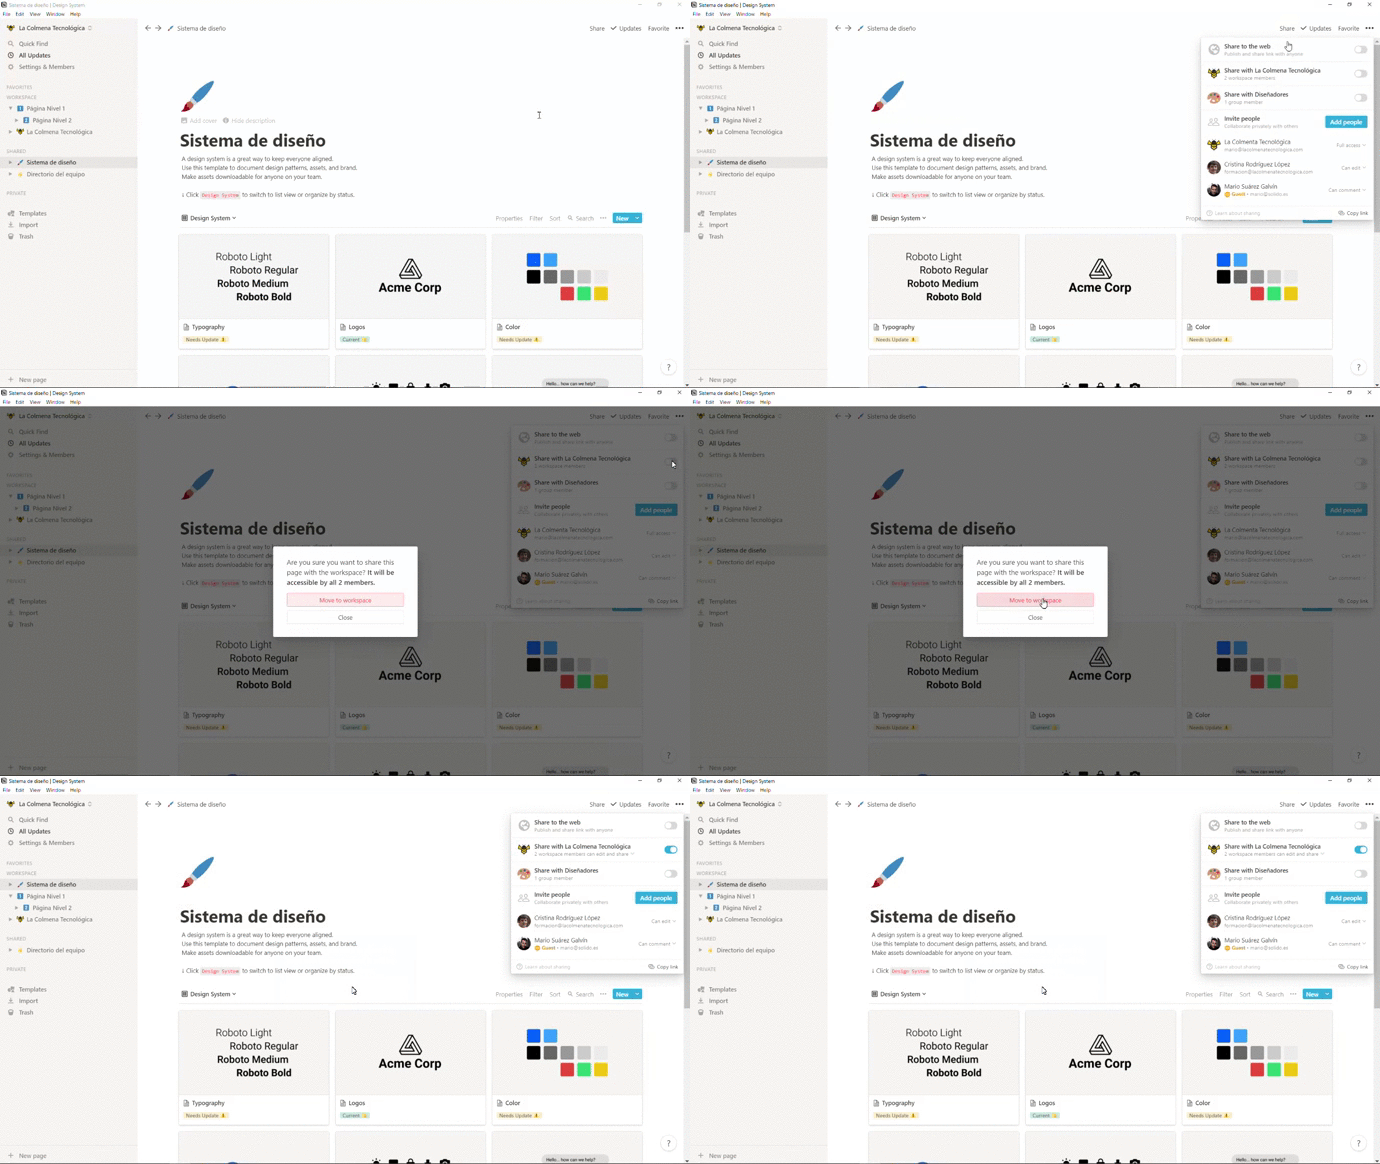
Share(Share) menu, you can enableShare with «Nombre de tu espacio de trabajo»(Share with “Your Workspace Name”) to give all members in your workspace access to the page at a certain level selected in the dropdown menu:
[/mepr-show]
Share with Team Members Individually
Sometimes, you’ll want to share a page with only a few members of your workspace, such as a meeting document you share with your manager or notes for a small project team.
[mepr-show rules=”7898″ unauth=”message”]
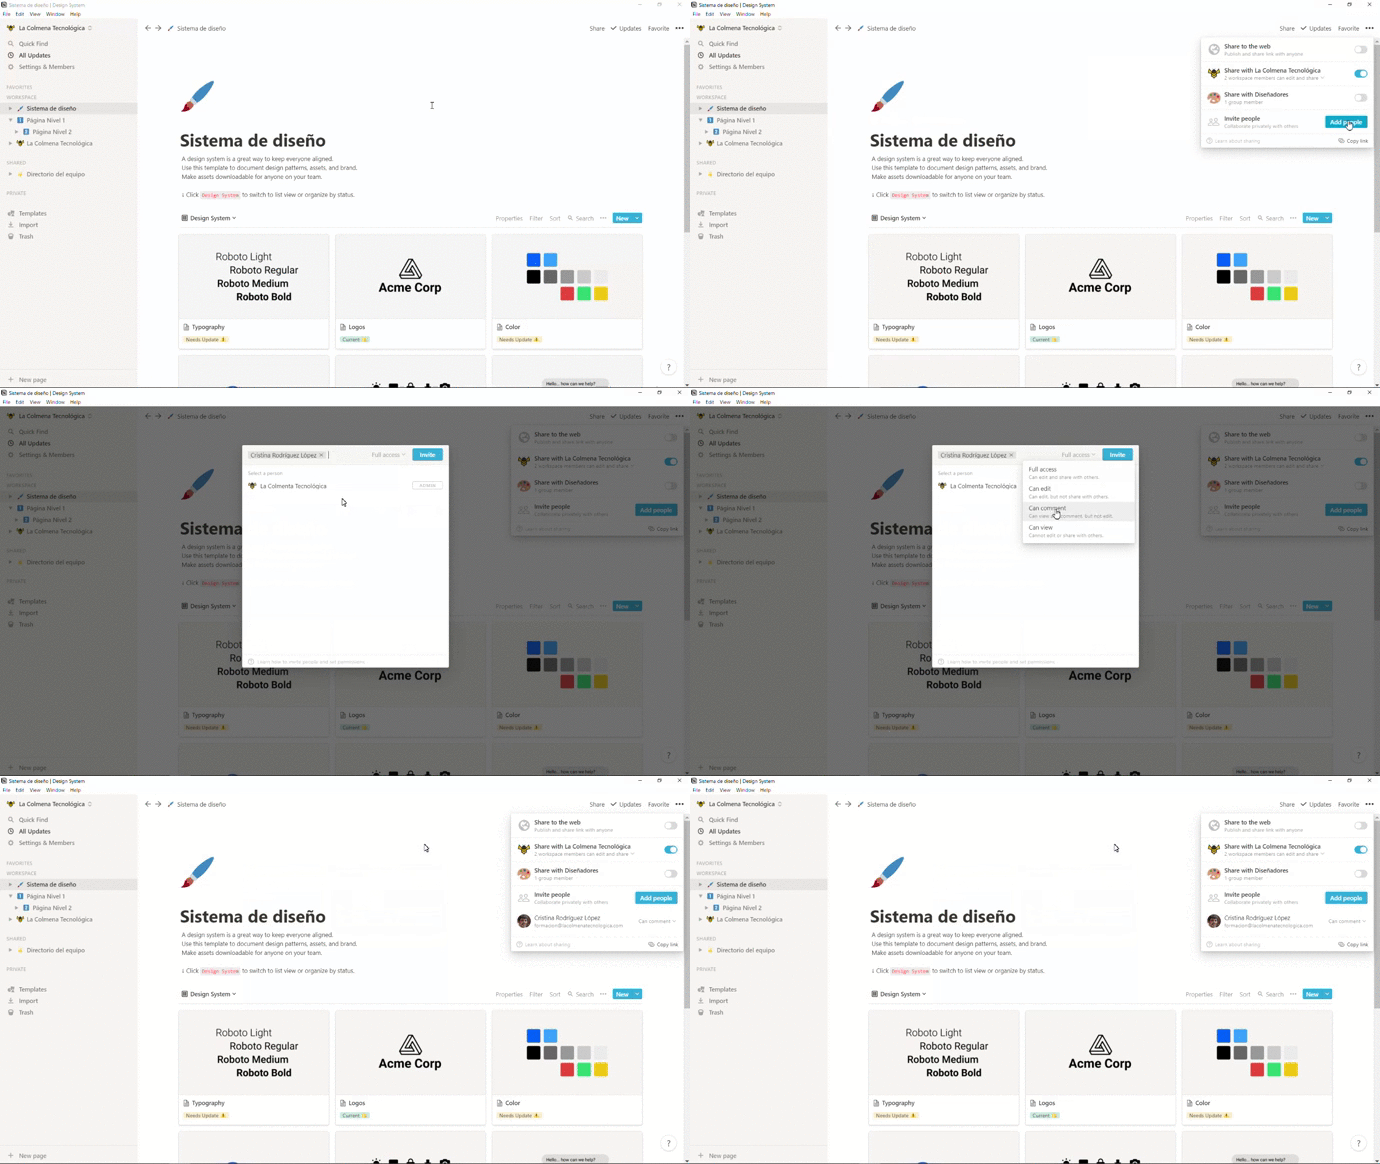
- Click
Share(Share) in the top right of a private page you want to share with these members. - Click the
Add people(Add people) button and add the members you want by typing their email addresses. You can configure their access levels from the dropdown menu in the invitation window. - Pages you share with a few members, but not your entire workspace, will appear in the
SHARED(Shared) section of your sidebar. Drag them to theWORKSPACE(Workspace) to share them with the entire team.
[/mepr-show]
Share with Groups
To make it easier to share with commonly used groups (i.e., your company’s engineering team or design team), you can create your own member groups and assign them permission to access pages as units.
Instructions for group sharing:
[mepr-show rules=”7898″ unauth=”message”]
- Go to
Settings & Members(Settings & members) and you’ll see a list of all your members and guests. Click theGroups(Groups) tab at the top of that list. - Click
Create a group(Create a group), name it, and add the members you want. - To share a page with a particular group, go to
Share(Share) in the top right of that page. You’ll see the group’s name (in this case, Designers). Enable access for that group and set an access level using the dropdown menu:
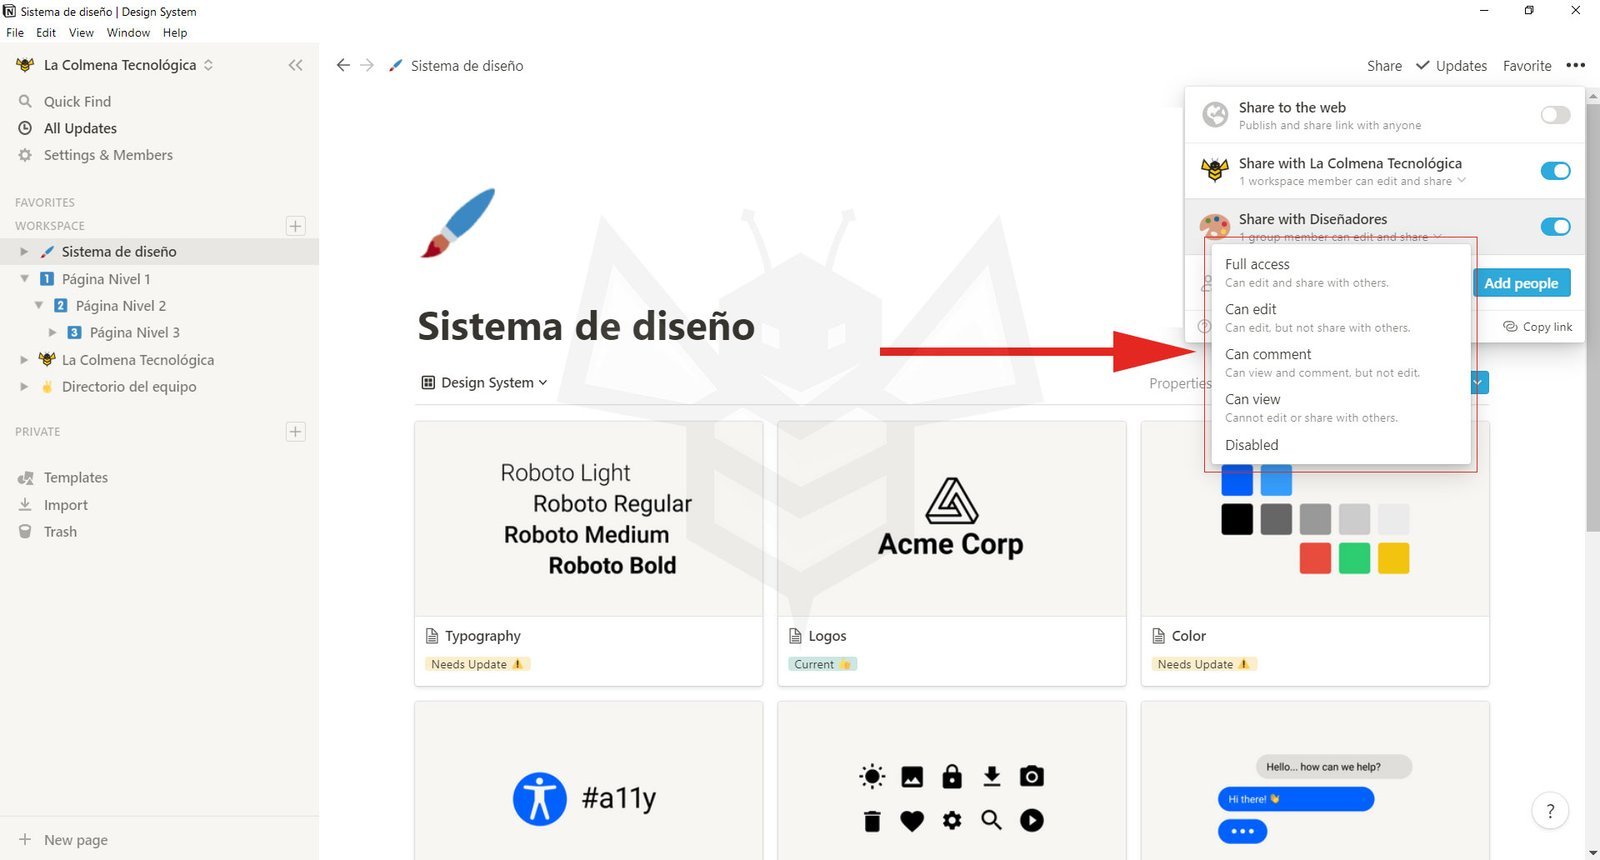
Tip: Share with your workspace and set the minimum access level for everyone. You should disable it or set it to
Can view(Can view) to give groups higher access levels.
Share with People Outside Your Team
You can invite people from outside your workspace to join pages as guests. Suppose you want to share a Notion page with an external company you’ve hired. Or perhaps you are a company and want to share a page with a client. This is an ideal solution.
Instructions for sharing with guests:
[mepr-show rules=”7898″ unauth=”message”]
- Click
Share(Share) in the top right of the Notion page you want to share externally. - Click the
Add people(Add people) button and add the people you want using their email addresses. Set their access levels using the dropdown menu. - Whoever you invite this way will receive an email with a link to the page you invited them to view or edit.
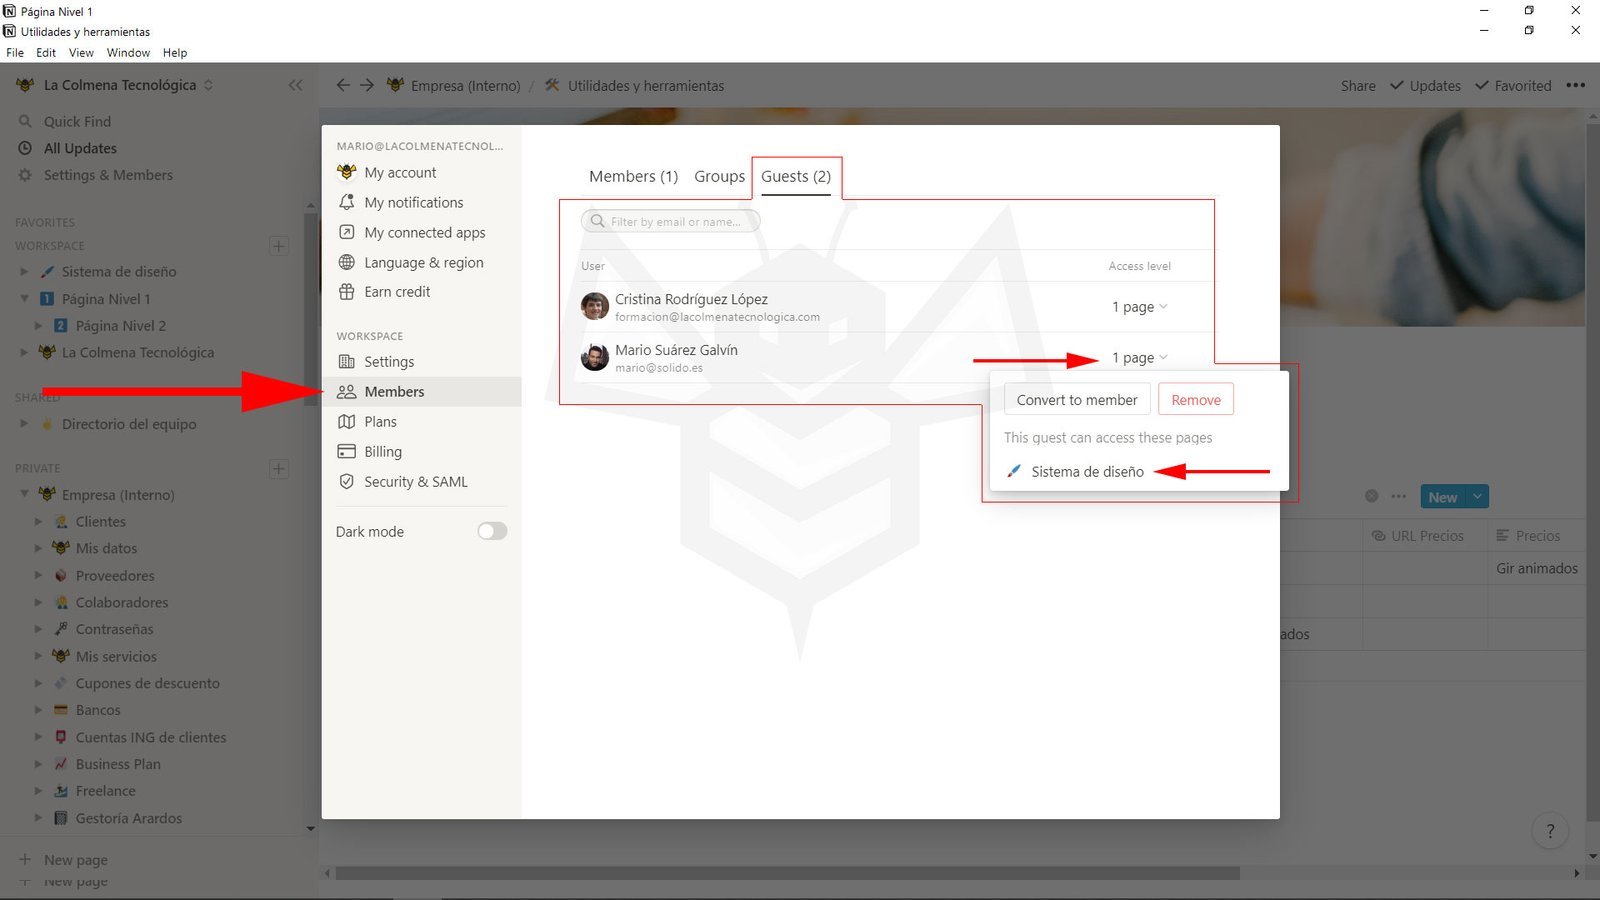
- If you want to see all guests in your workspace and the pages they have permission to access, go to
Settings & Members(Settings & members) and in the Members section, click theGuests(Guests) tab. - In this same window, you can remove guests from your workspace, change their access levels, or convert them to full members.
[/mepr-show]
Share to Web
To make a Notion page visible as a website or to share it with people who don’t use Notion, you can enable Share to the web (Share to web). Anyone with the link will be able to view it.
Instructions for making pages public:
[mepr-show rules=”7898″ unauth=”message”]
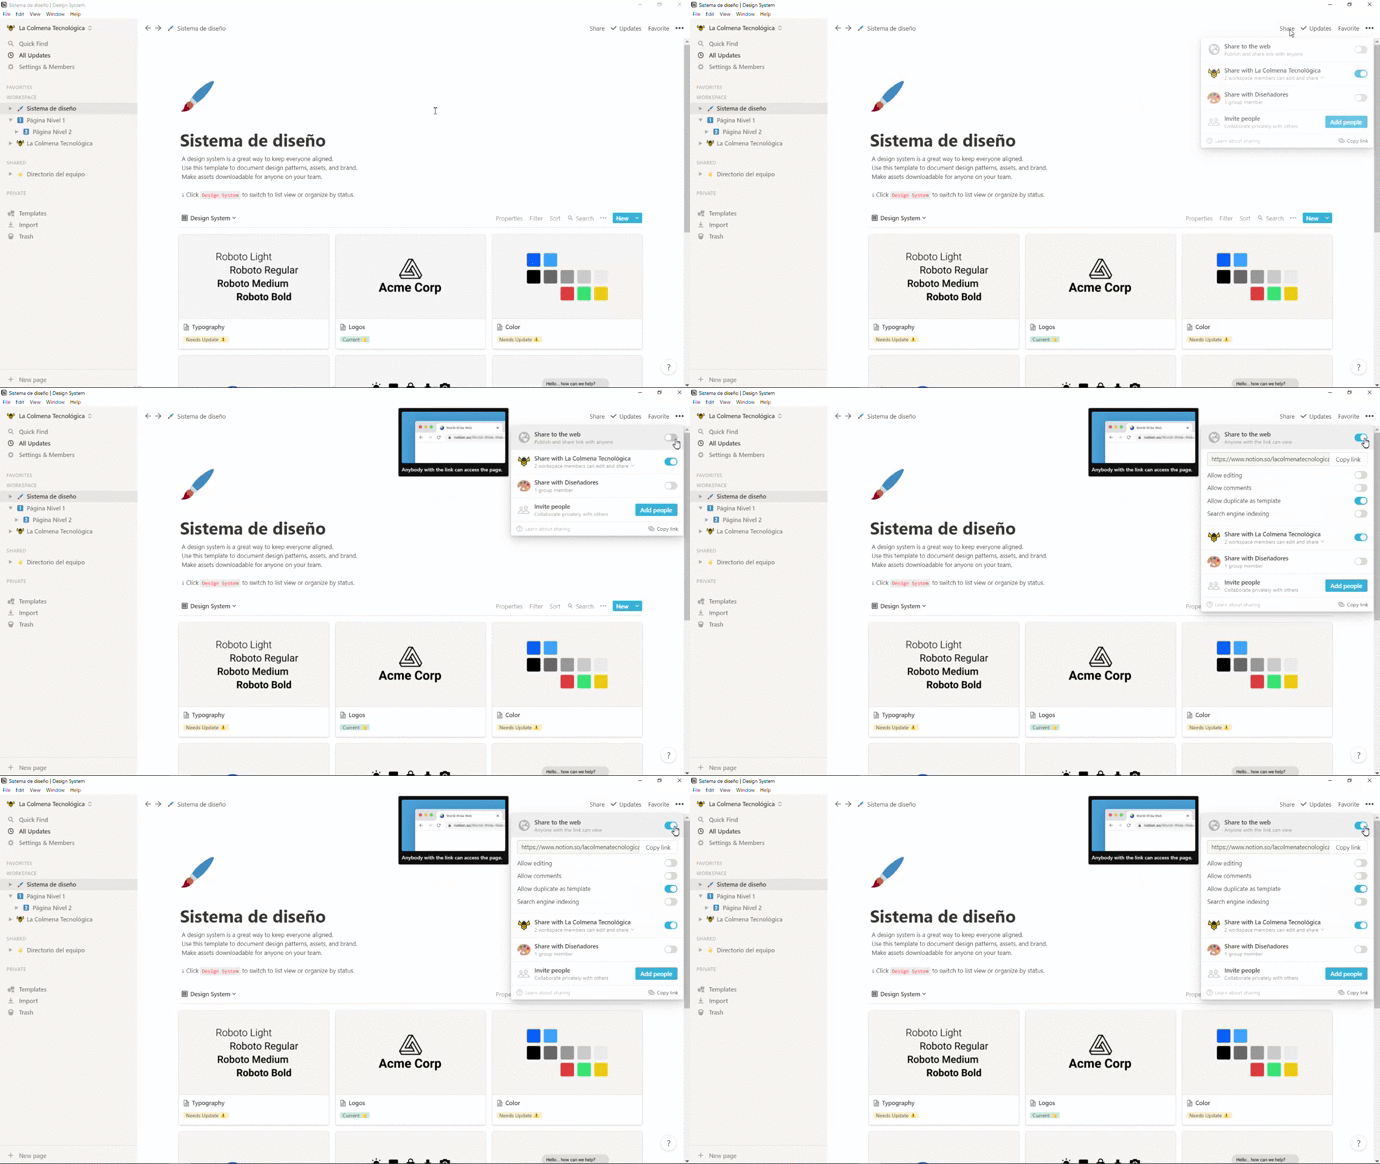
- Click
Share(Share) in the top right of the page you want to publish to the web. - Enable
Share to the web(Share to web). - By default, the access level will be
Anyone with the link can view(Anyone with the link can view). - You will also see a couple more options:
Allow editing(Allow editing) will allow anyone with a Notion account to make changes to your page after you share the link with them. For the user you share with to be able to edit, they must click theEditbutton, shown above on the right.Allow comment(Allow comments) will allow anyone with a Notion account to leave comments on your page after you share the link with them.Allow duplicate as template(Allow duplicate as template): Disable this option so that other Notion users cannot duplicate your page into their own workspace for editing. This option is enabled by default.Search engine indexing(Search engine indexing): Feature only available on paid plans. Enable it so your page can appear in Google and other search engine results. This is disabled by default.
- Click
Copy link(Copy link) to copy the page’s unique URL to share. - Only people with the page’s unique URL will be able to view it.
[/mepr-show]
Stop Sharing
If you have full access to a page, you can disable sharing with anyone at any time.
- The quickest way is to move the page from
WORKSPACE(Workspace) orSHARED(Shared) in the sidebar to thePRIVATE(Private) section. However, make sure this is what you really want to do, because everyone else will lose access. - Click
Share(Share) in the top right of the page and disable access to your workspace, individuals, groups, or the public. You can also selectDisabled(Disable) from the dropdown menu next to any of these. - For guests, click
Share(Share) and then selectRemove(Remove) from the dropdown menu next to their names. You can also go toSettings & Members(Settings & members), scroll down to find the guests you want, click the dropdown menu to the right of their names, and click theRemove(Remove) button.
Permission Levels
This is where Notion’s sharing options become nuanced and granular. For each person or group you share with, you can assign a different access level. For example, this is useful if:
- You want only a few people to edit a page, while everyone else reads it.
- You want some pages to be visible only to a specific team.
- You only want to collect feedback on a document.
Below are all the access levels you can choose from and what they mean.
One more reminder that when you share a page, all sub-pages within it will be shared with the same people in the same way.
How to Edit Permissions
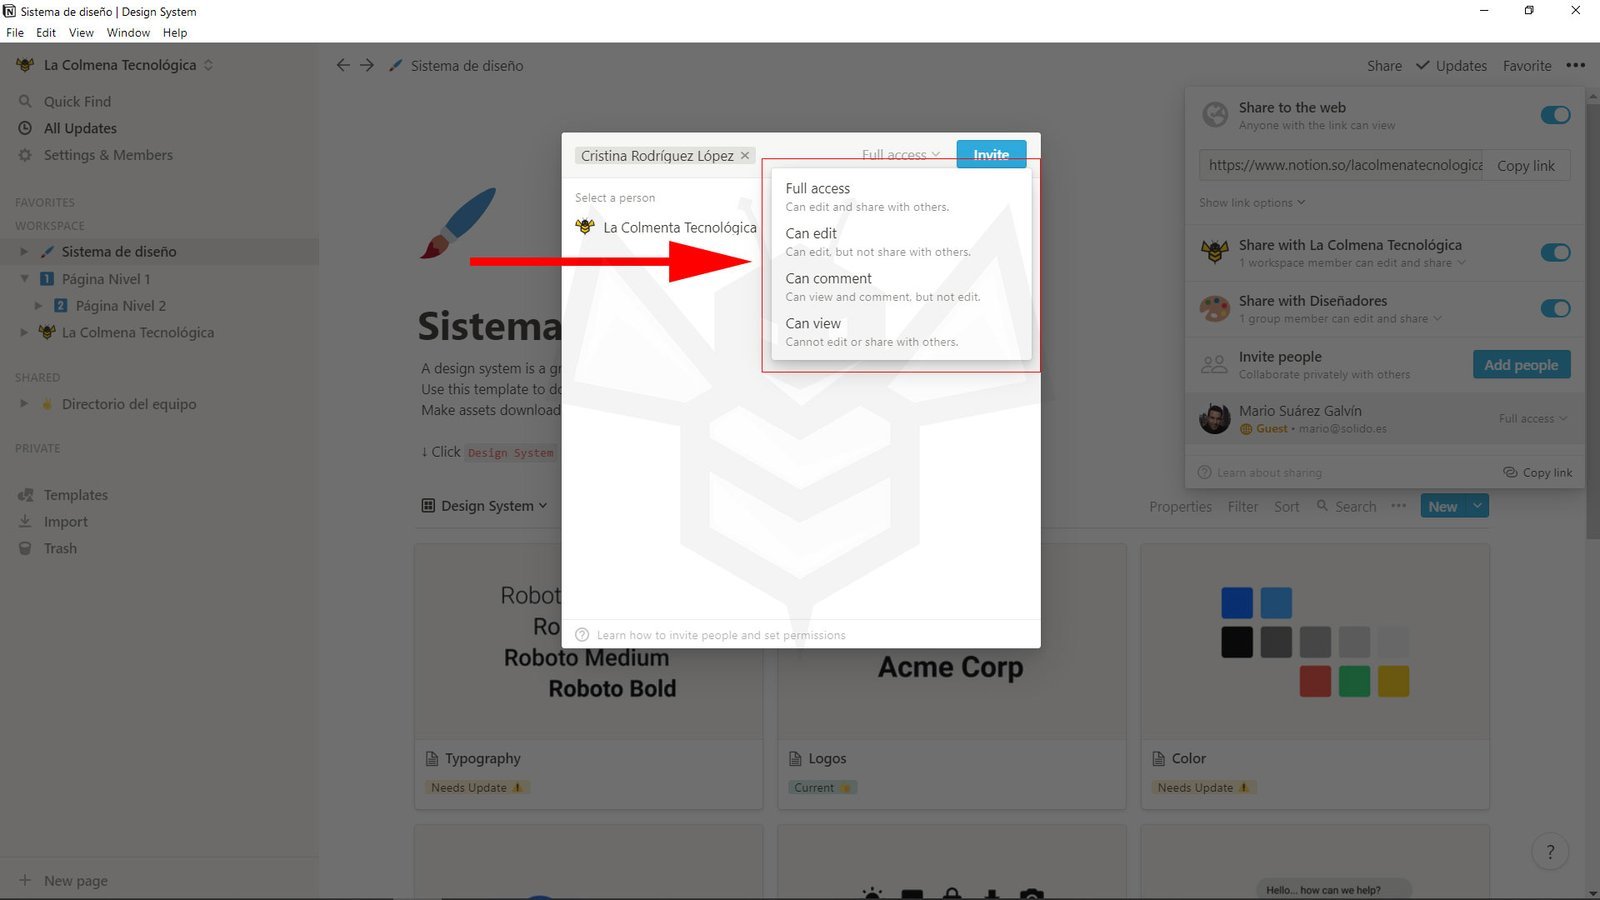
Whenever you invite someone to a page, or click Share (Share), you’ll see dropdown menus on the right next to people or groups that allow you to select their access level: Full access (Full access), Can edit (Can edit), Can comment (Can comment) y Can edit (Can view).
- Here’s how it looks in the
Invite(Invite) menu when you clickAdd people(Add people):
(Type their email, select their access level, and then clickInvite(Invite).
[mepr-show rules=”7898″ unauth=”message”]
- And here’s how that dropdown menu looks next to groups and guests in your
Share(Share) menu:
[/mepr-show]
Full access
People with full access to a page can edit any content it contains and share the page with anyone they want using all the mechanisms discussed in this topic.
Can edit
Select this access level for people or groups who should be able to edit the page’s content, but not share the page.
Can comment
Select this access level for people and groups who should only be able to comment on a page’s content, not edit it. They also cannot share the page with others.
Can view
People with Can view (Can view) access can simply read the page’s content, but not comment on or edit it. They also cannot share the page with others.
Disable Access
To revoke a person’s or group’s access to a page (and its sub-pages), choose Disable (Disable) from the list of access options in the dropdown menu to their right in the Share (Share) menu. They will no longer be able to see the page, and it will disappear from their sidebar.
- Remove a guest by selecting
Remove(Remove) from the dropdown menu to the right of their name in theShare(Share) menu.
Share with Workspace
The Share with «Nombre del espacio de trabajo» (Share with “Workspace Name”) option is found in the Share (Share) menu if you have a Team plan or an Enterprise plan. When enabled, all members of your workspace have that level of access to the page. It can only be overridden by a higher level of access granted to individuals, guests, or groups.
- If you want a page in your workspace to be visible only to certain people, you will need to disable
Share with «Nombre del espacio de trabajo»(Share with “Workspace Name”) for the page or invite them to a page that would otherwise be private.
People who do not have access to a page will not see it in your Workspace. It may appear in your sidebar, but not in theirs.
Sharing Settings
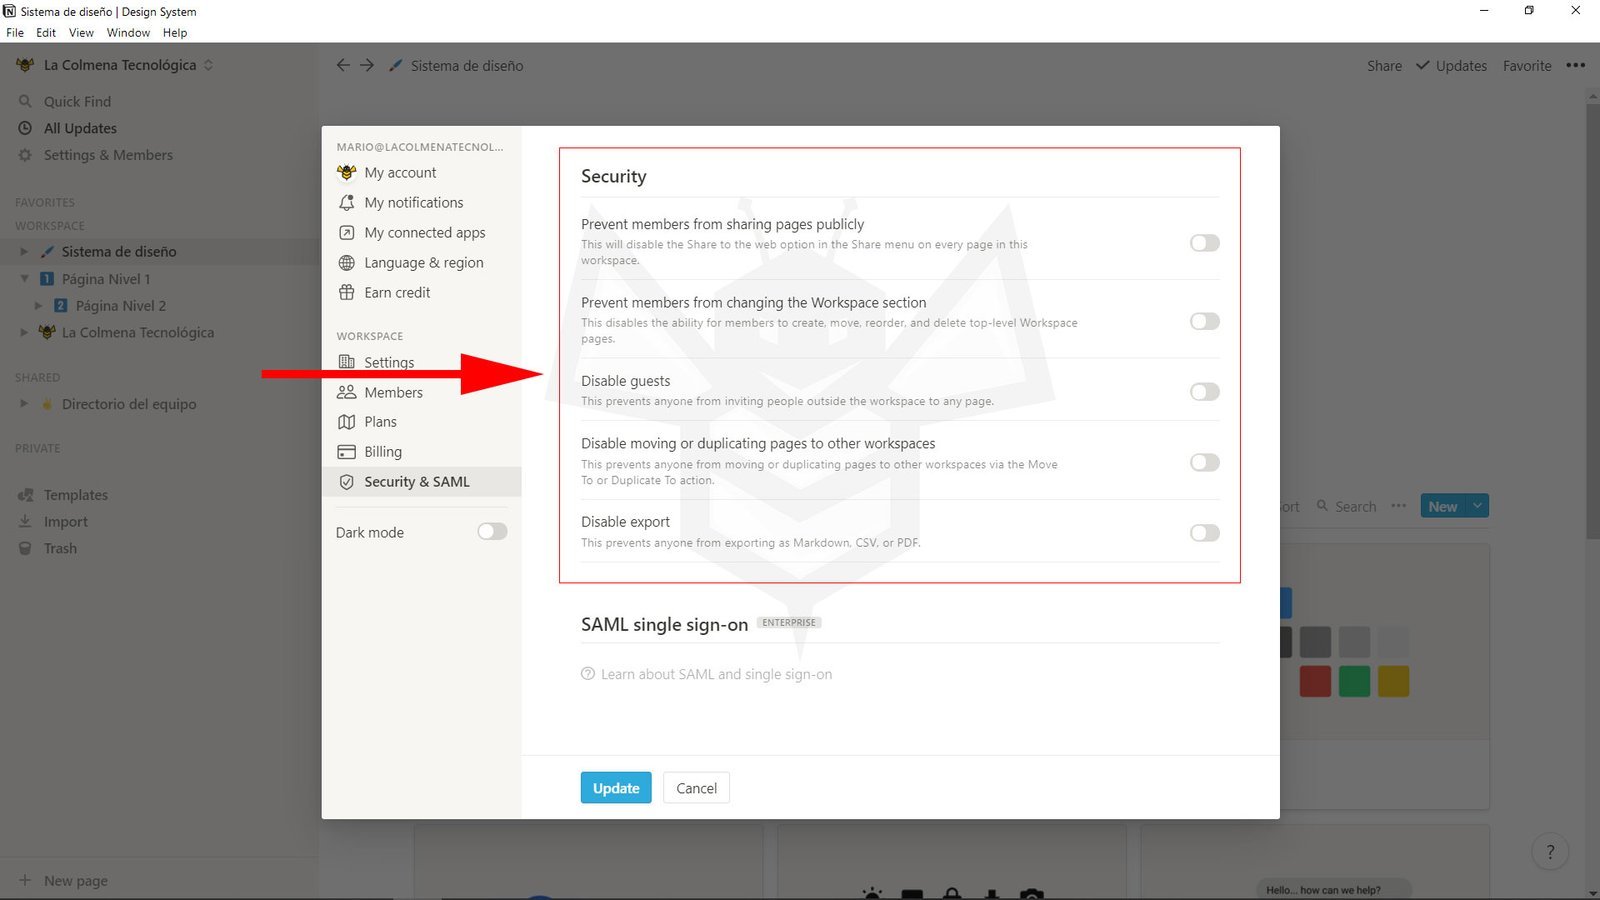
If you have an Enterprise Plan subscription and are an administrator in the workspace, you can prevent content from being shared by enabling certain security settings.
[mepr-show rules=”7898″ unauth=”message”]
- Go to
Settings & Members(Settings & members) at the top of the left sidebar. - Click
Security & SAML(Security & SAML) in the sidebar of the window that appears, where you will see five toggles.- Prevent members from sharing pages publicly: Enable this option to disable the
Share to the web(Share to web) option for everyone in your workspace. Content cannot be put on the web. - Prevent members from changing the Workspace section: This disables members’ ability to create, move, reorder, and delete top-level workspace pages.
- Disable guest: Enable this option to prevent members of your workspace from inviting people outside your team to Notion pages.
- Disable moving pages to other workspaces: Enable it to prevent members from moving pages between workspaces.
- Disable export: Enable this option to prevent members of your workspace from exporting individual pages as downloadable files that can be shared outside Notion.
- Prevent members from sharing pages publicly: Enable this option to disable the
[/mepr-show]
These options can only be edited if you have a Team or Enterprise plan subscription, are a workspace administrator, and are on desktop.
See Who Shares a Page
[mepr-show rules=”7898″ unauth=”message”]
You can tell who else has access to a page because their avatars (profile pictures) can be seen in the bar at the top of the page.
- An avatar appears faded if that person is not currently viewing the page.
- An avatar appears unfaded if the person is currently on the page.
- Hovering over an avatar will show you the person’s name, email, and when they were last on the page.
- When people collaborate on the same page at the same time, you’ll see their avatars move next to the blocks they are viewing or editing.
- Click ••• in the top right of any page and look at the bottom of the menu that appears. You’ll see who last edited the page and when.
[/mepr-show]
Frequently Asked Questions
[mepr-show rules=”7898″ unauth=”message”]
You may have the Allowed Email Domains (Allowed email domains) setting enabled. When enabled, this feature allows people with that email domain to automatically join your workspace as members. You can disable this setting in the Settings (Settings) tab of Settings & Members (Settings & members) in the left sidebar.
You can enable Share to the web (Share to web) in the Share (Share) menu and share the URL with them. As long as you keep the Search engine indexing (Search engine indexing) setting disabled (always disabled by default), only people with that exact URL will be able to access the page. They will be able to view the page, even if they don’t have a Notion account. However, they will not be able to make modifications, leave comments, or sort/filter a database.
You may have the Disable export (Disable export) setting enabled in the Security & SAML (Security & SAML) tab of Settings & Members (Settings & members) in the left sidebar. You must be an administrator in your workspace and on desktop to change this.
Unfortunately, database permissions are not yet that granular. However, it is a legitimate use case and definitely something Notion will implement in the future. Stay tuned!
[/mepr-show]