Join our list and receive the latest news. Subscribe so you don't miss any updates.
Table of contents
Step-by-Step Video
What is a popup?
A popup, pop-up message, or in English popup, is a window that appears (“emerges”) while you browse a website. They are used for many reasons: to offer discounts, notifications, encourage newsletter subscriptions, promote content, and more.
But we won’t dwell much longer on popups because this topic isn’t about how to create them, but how we can open them via a link similar to this:
We will also learn in this topic how to configure our popup so that it has a link like this: #popup-link
“popup-link” is a name we invented; later we will see how we can set any ID we want to open our popup.
Making Our Popup Active Across the Entire Website
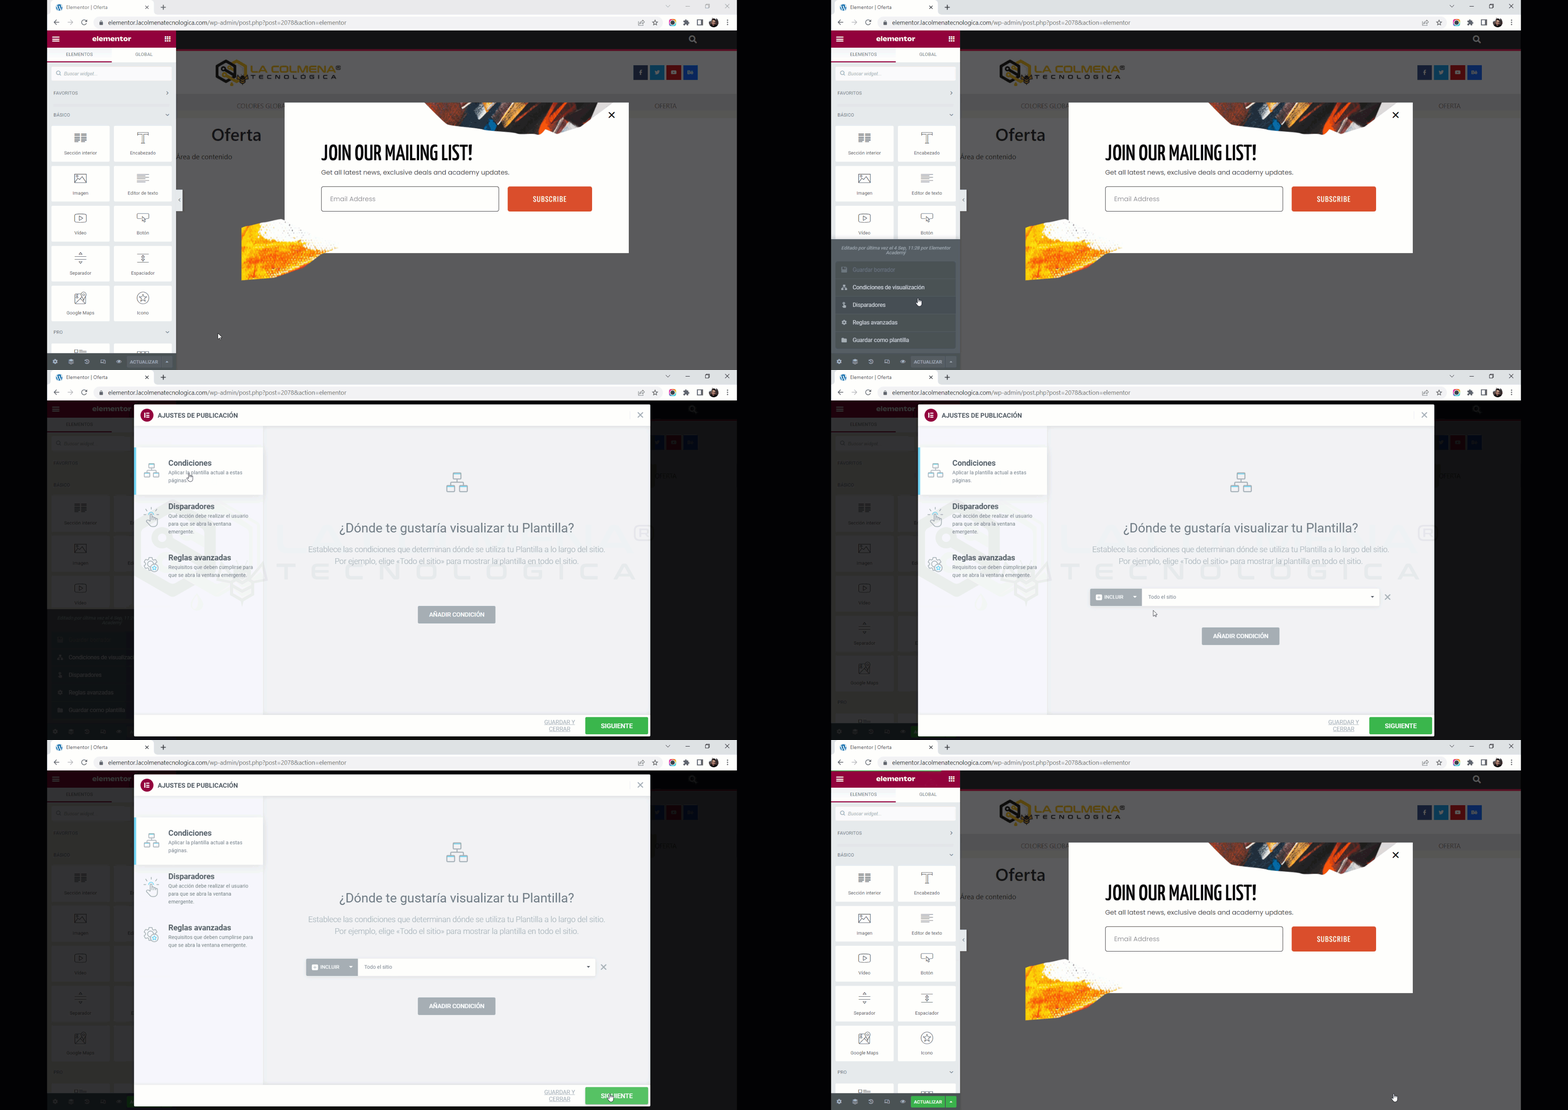
Something very important we must do is set the condition for our popup to be active on Entire Site. Imagine adding the link to a blog post or our main menu; if we don’t have this display condition, the popup might not be active and won’t open in certain parts of our website. Let’s see how it’s done.
Open the Popup with Elementor.
Click the arrow to the right of the Update button > click the Display Conditions option in the pop-up menu.
A pop-up window will open with several tabs on the left side. Keep the Conditions tab > click the Add Condition button and leave the default condition, which is Entire Site.
Now we just need to save by clicking the Save & Close link, or by clicking the Next button and then the Save & Close button.
Now our popup will be active across our entire website. There’s no need to configure Triggers or Advanced Rules if you don’t need them.
How to Get the Link That Opens Our Popup
Let’s look at three ways to get the link that opens our popup. We should know that each popup has its own link, and this link does not change, so once we obtain it, we can use it anywhere on our website, as many times as we want.
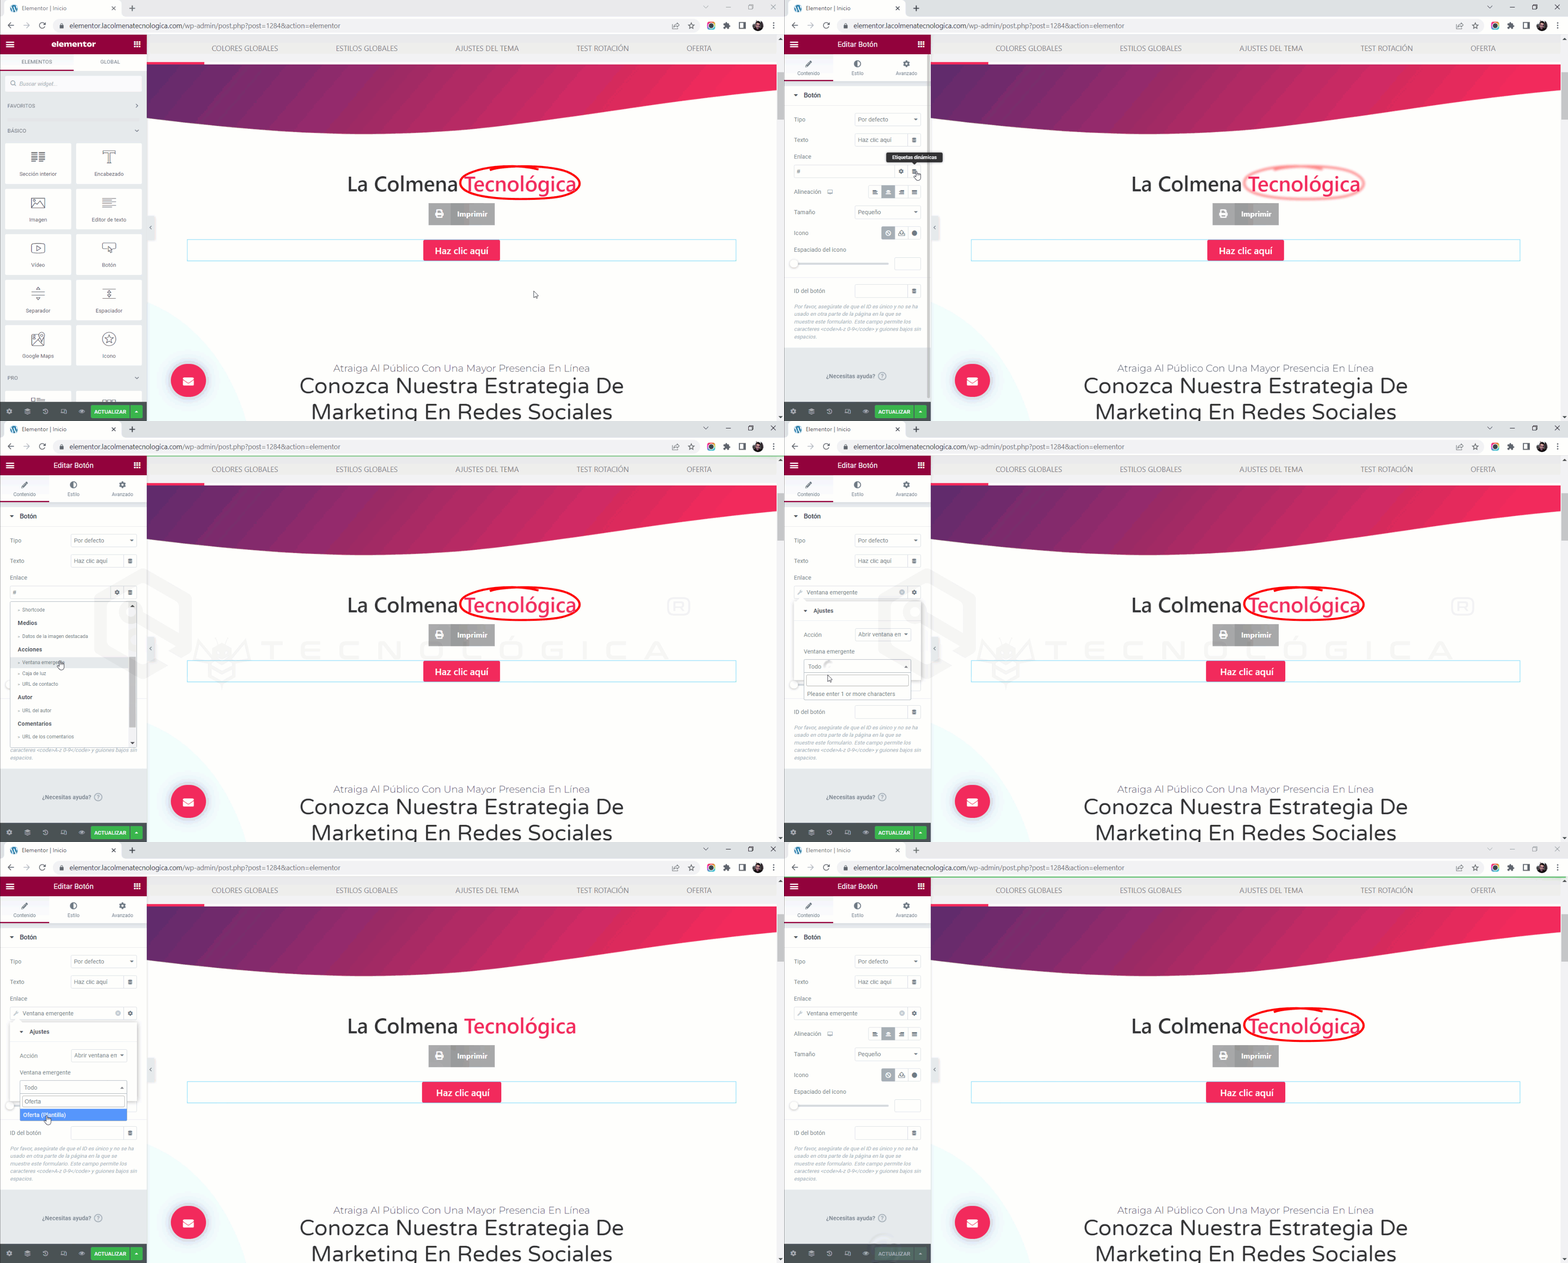
Add the ‘Open Popup’ Action to a Widget
For the first two methods, we need to add the action to open the popup to an Elementor widget. We can use any widget that has a link field; in this example, we will use the Button widget.
Click the button to select it.
In the Content tab, click the Dynamic Tags button for the Link property > select the Popup action.
Click Popup > click All and type the name you gave the popup. Once you start typing, matching results will appear. Now click the popup’s name.
Finally, click the Update button to save the changes.
Once this is done, the button will have the action assigned to open the popup, and you can obtain the link through it.
Get the Popup Link from the Browser Inspector
Once we have added the action to open the popup to a widget, in this case a button, we just need to open the page where we inserted it in the browser and follow these steps:
Open the page where the button is located in the browser (in this case, Google Chrome).
Right-click on the button > click Inspect from the context menu.
From the Inspector, right-click on the link that includes the open action. You can identify it because it starts with #elementor-action… > click Edit attribute from the context menu.
Now the link will be highlighted, meaning it’s selected, and you can copy it by pressing CTRL+C or by right-clicking on it > click Copy from the context menu.
Now you have the URL that triggers the popup to open. You can paste it into a text file for later copy-pasting and use it wherever you want.
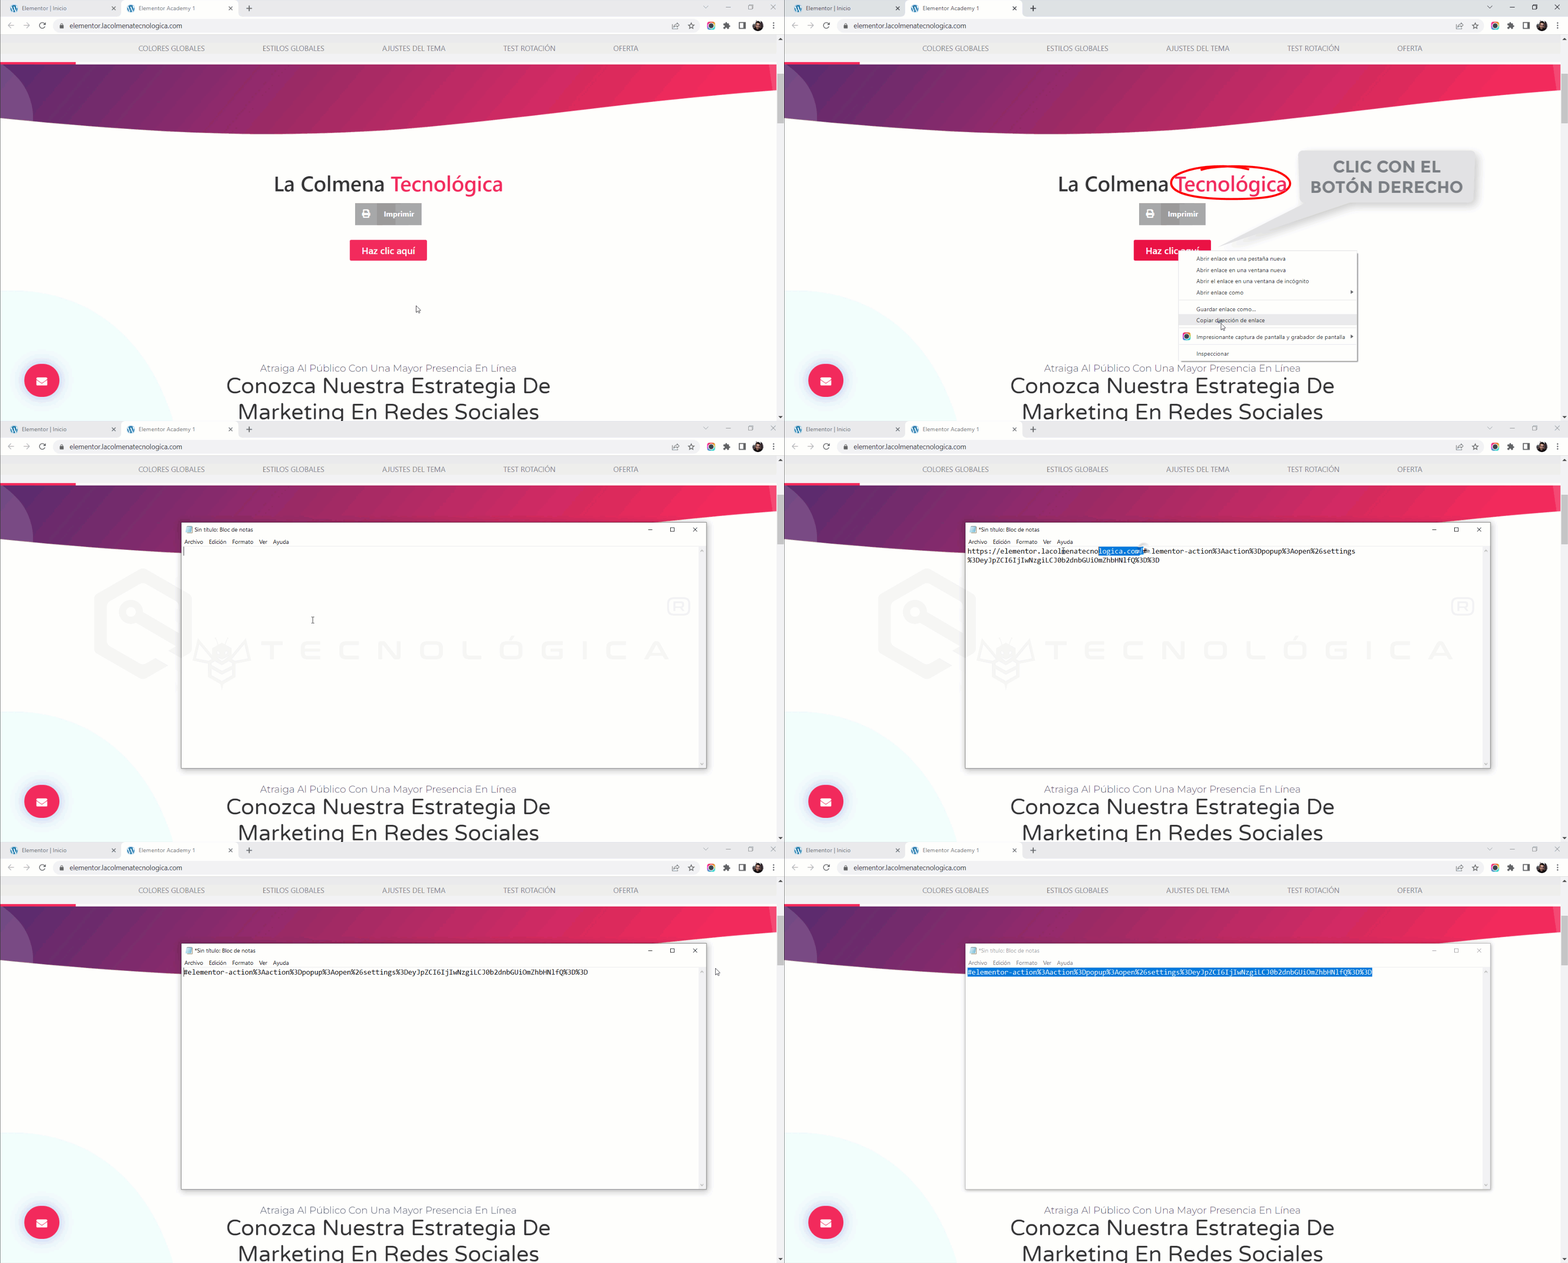
Get the Popup’s Internal Link from a Widget
Another way to get the internal link of the popup is by copying the link directly from the widget, in this case, from the button. Let’s see how to do it:
Right-click on the button > click Copy link address
Use Notepad to paste the link with CTRL+V
Select and delete everything after #elementor-action…
And now you have the link that opens the popup. The button has already served its purpose, and we can delete it; this will not affect anything since the link is always the same for that popup.
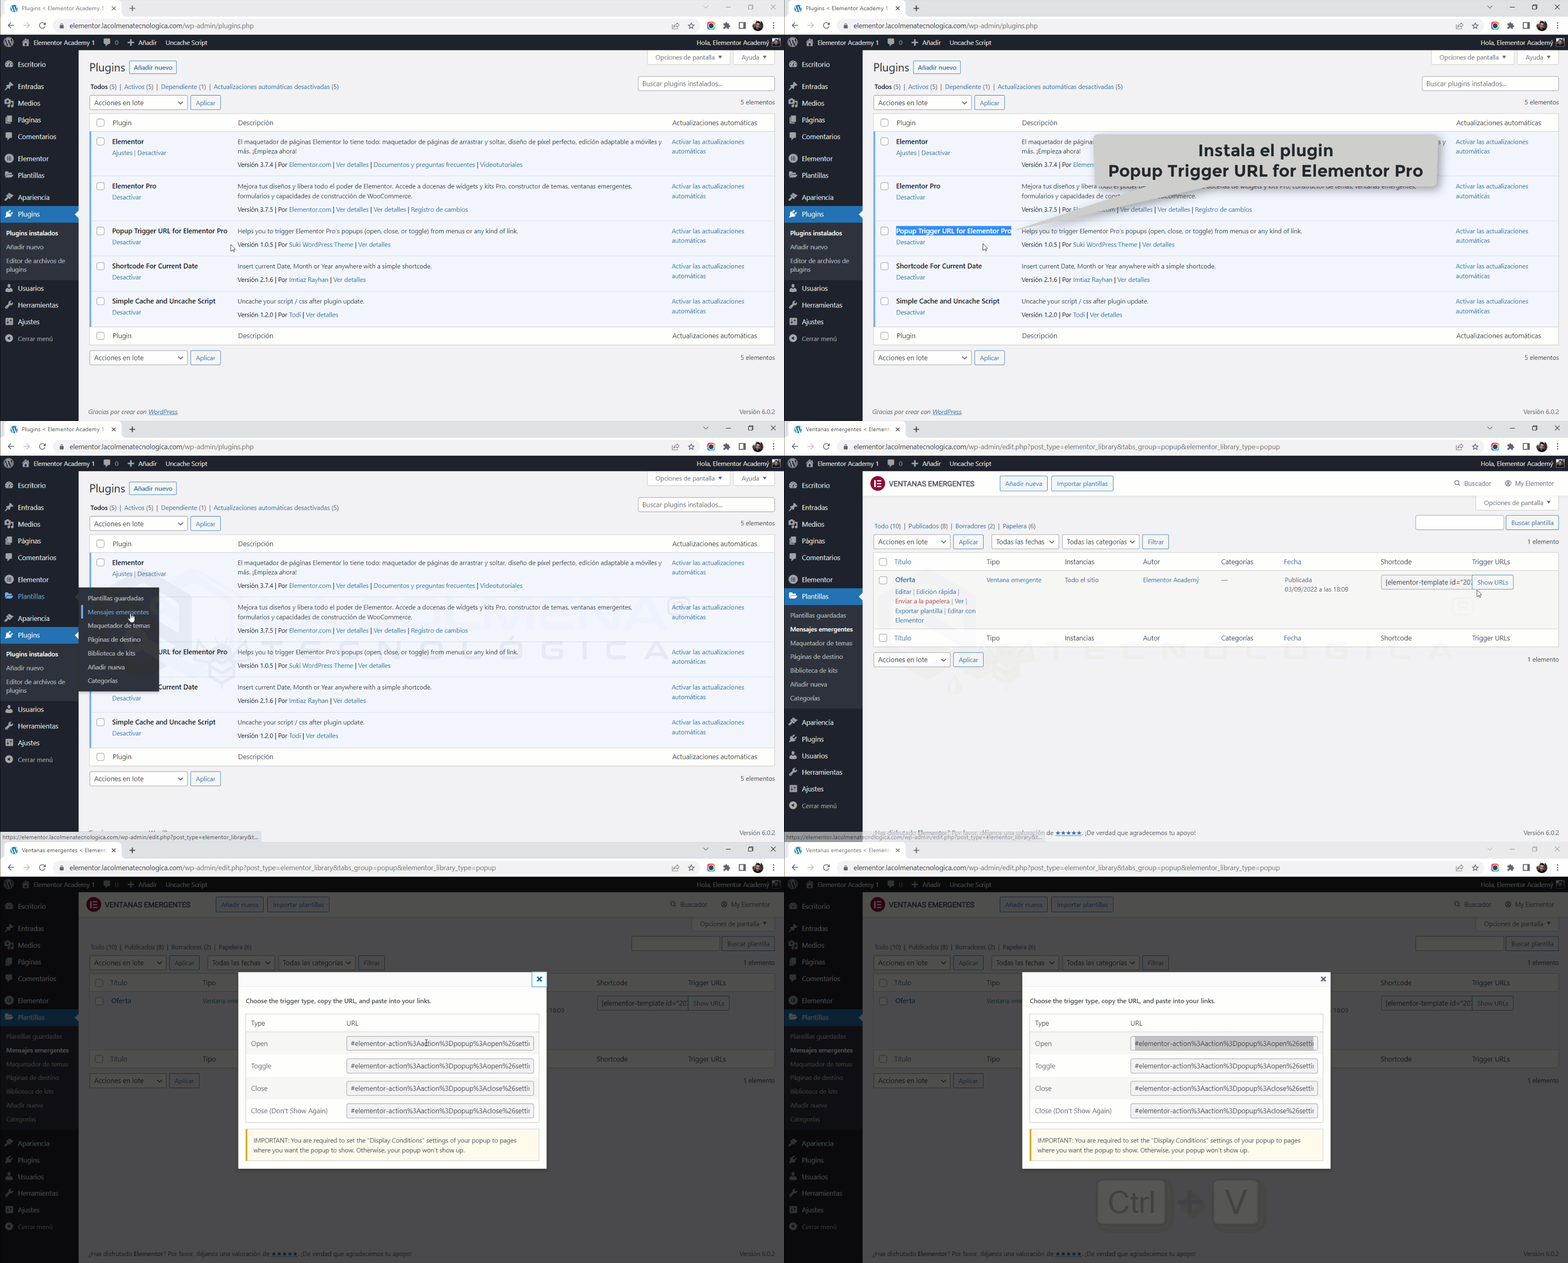
This plugin has a single function: to add a button to the right of each popup template that, when clicked, shows you the link that opens the popup so you can copy and use it wherever you want.
In the list of templates, you will find the Show URLs button to the right of each one. Click it, and a popup will appear with all available links for that popup message.
To display the popup, we only need the first one (Open), but this plugin also provides three others: Toggle, Close, and Close (Don’t Show Again).
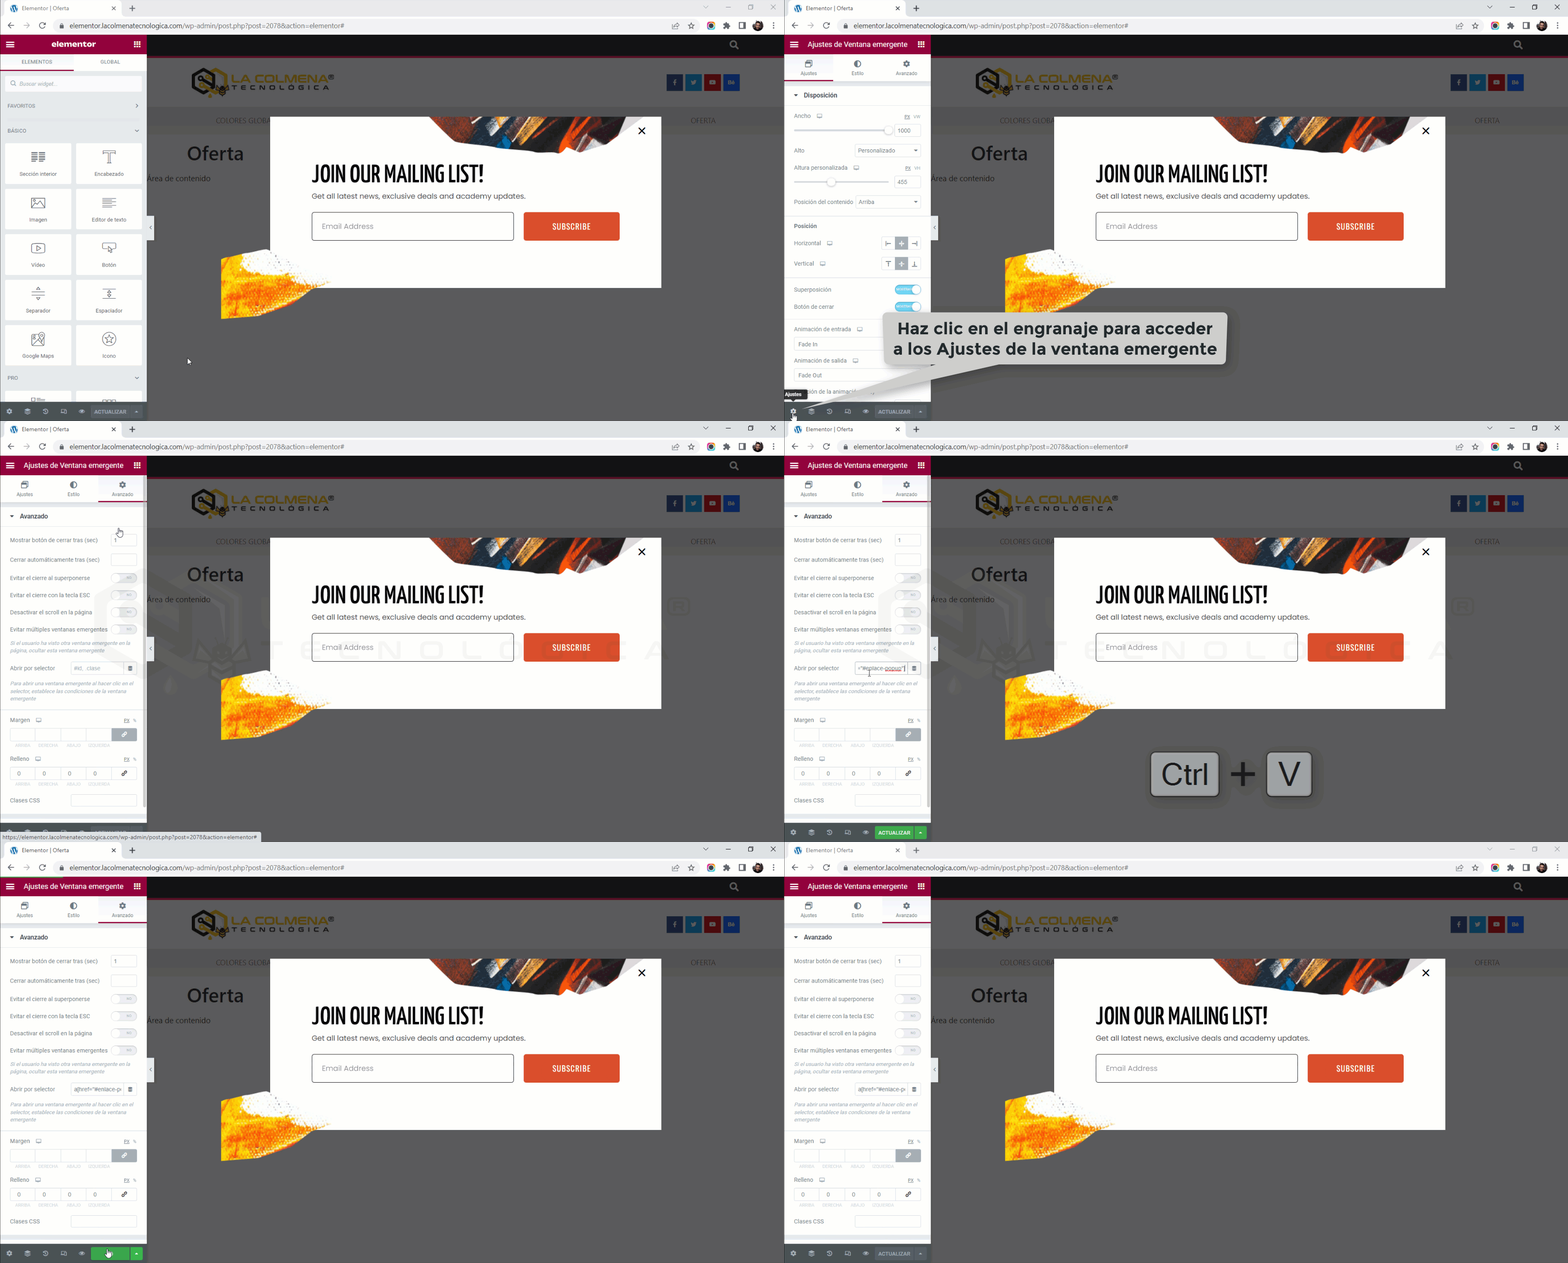
Configure Our Own Link to Open a Popup
We can also customize and shorten the link for our popups. To do this, follow these steps:
Open the popup in the Elementor builder.
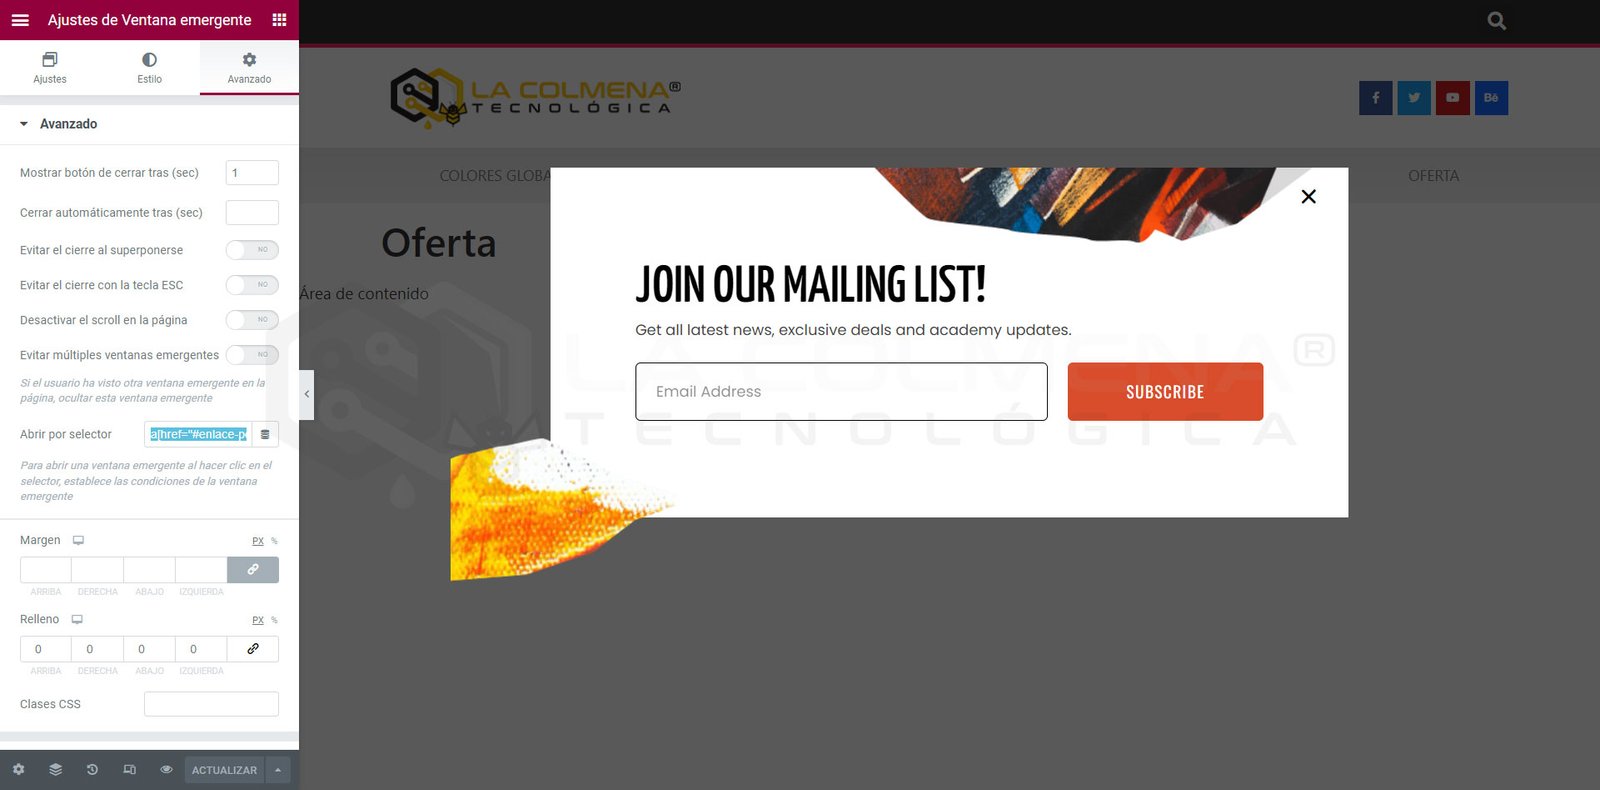
Go to the popup settings by clicking the gear icon in the bottom left corner.
In the Advanced tab > Open by Selector, create an anchor activation link shortcode, for example: a[href="#enlace-popup"]
Apply this link anywhere on your website by linking with the anchor trigger link (e.g., #popup-link)
The text #popup-link is our choice; we can set any name we want, always without spaces or special characters, and preferably in lowercase. Remember to set the popup’s display conditions to Entire Site.
How to Apply the Obtained Link to Open the Popup
Once we have the link, we can apply it to any link created with Elementor, Gutenberg, or even in our website’s menu. Let’s look at some examples.
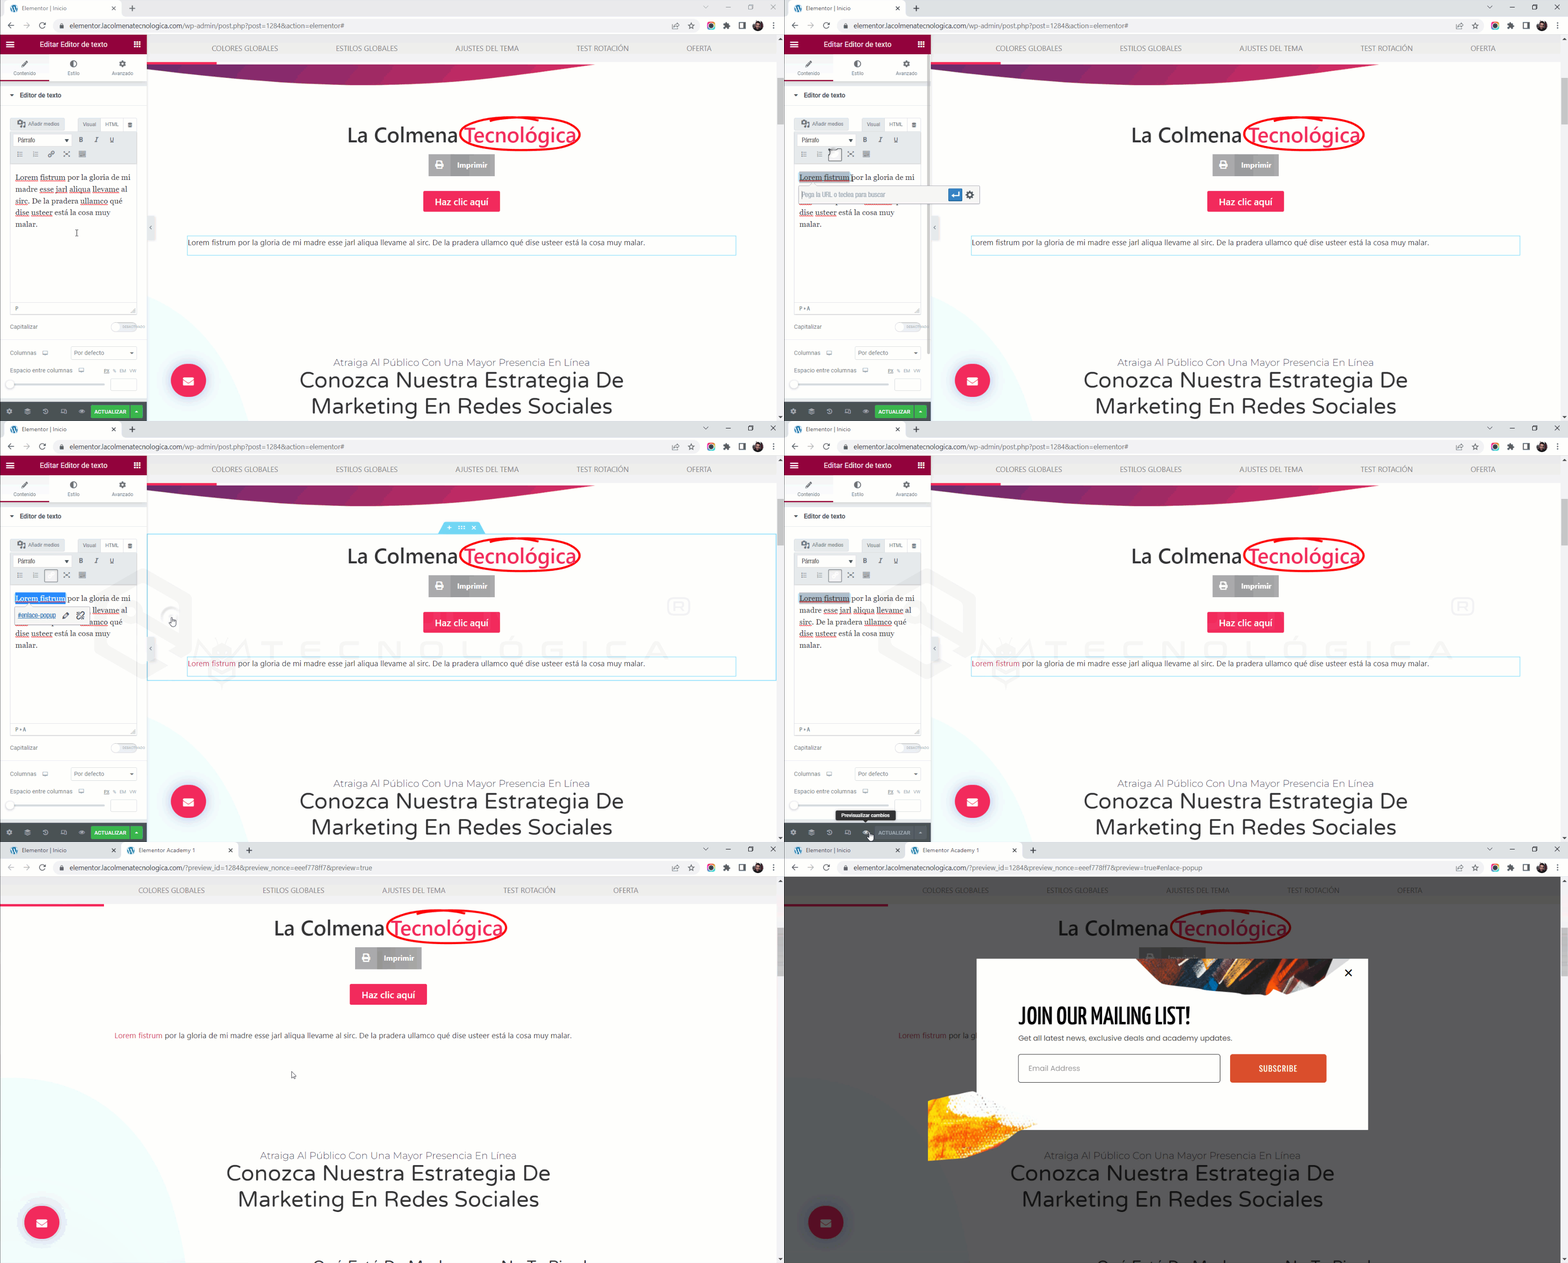
Apply Link to the Text Editor Widget
In the Text Editor, select the text to which you want to apply the popup opening link.
Click the Insert/Edit link (Ctrl+k) tool.
Then press Ctrl+V to paste the link, keeping in mind that you would have previously copied the link with Ctrl+C.
Now, all that’s left is to click the Update button and test our popup opening link.
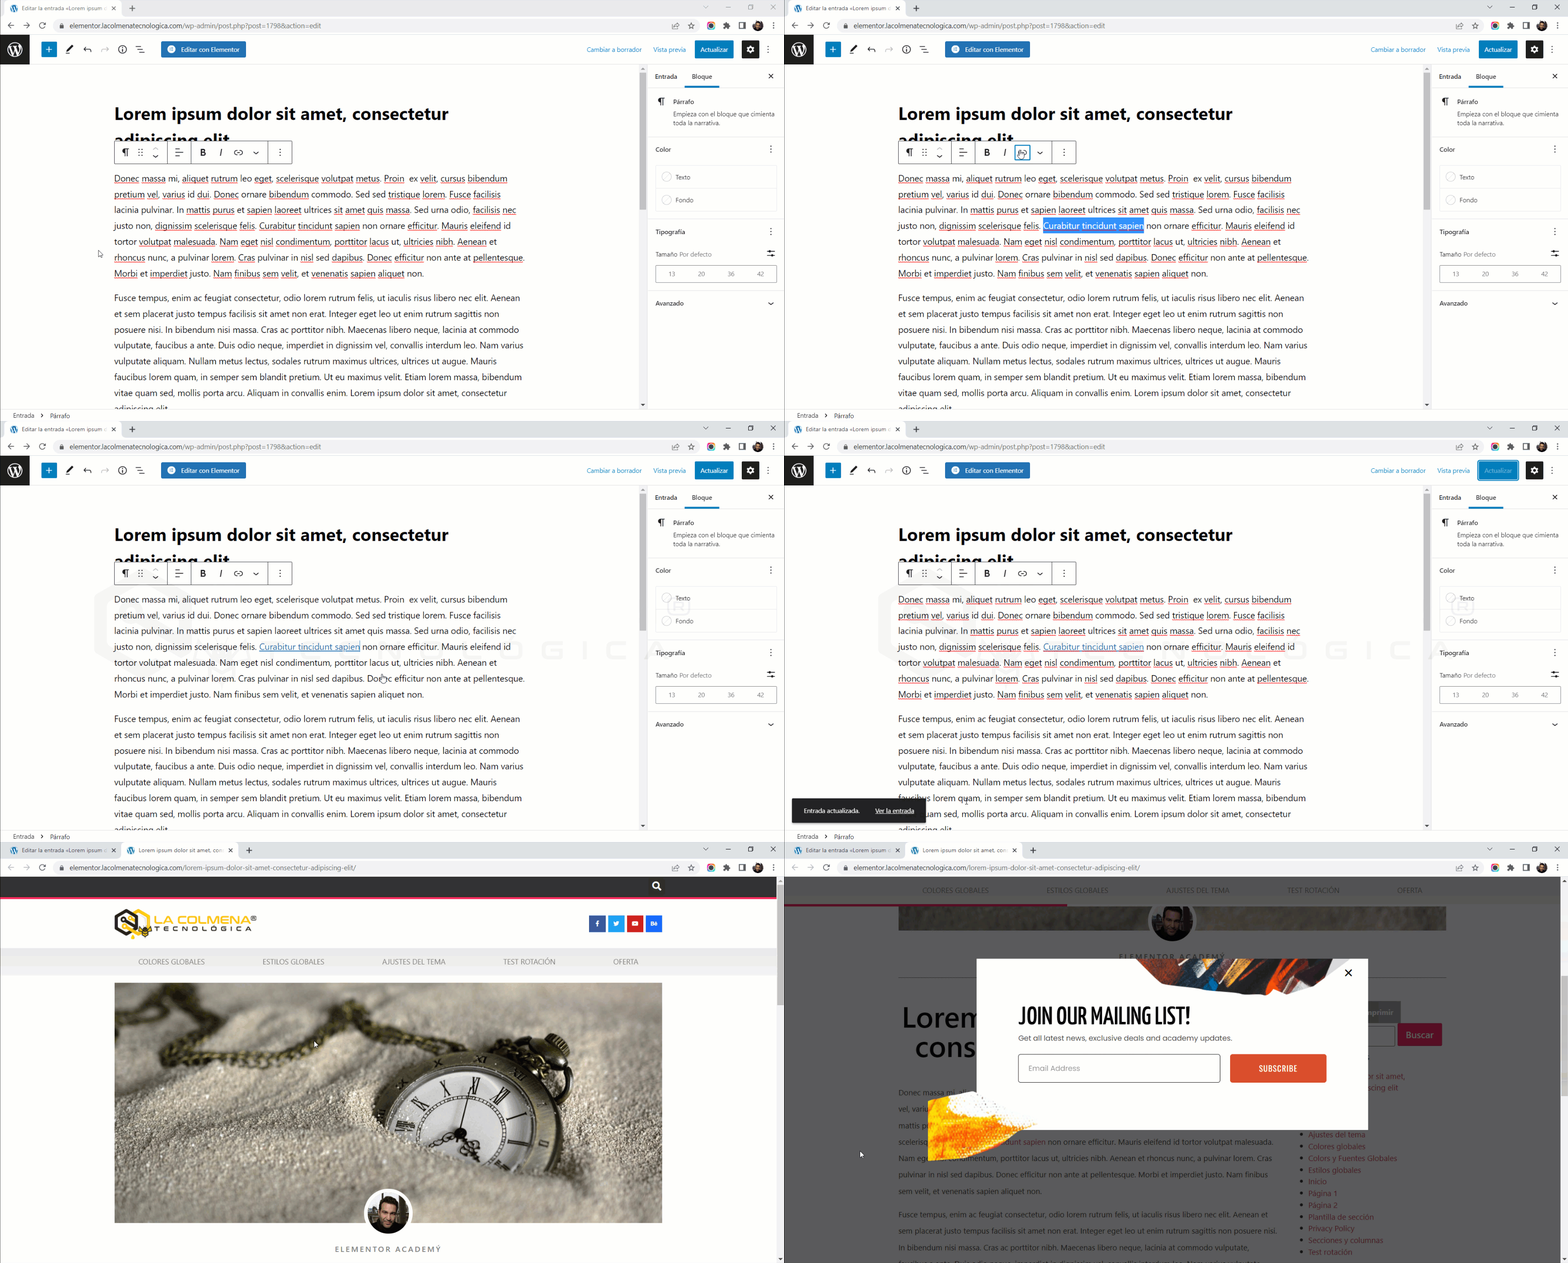
Apply Link to Post Text with the Gutenberg Editor
We can apply it not only to text but also to a button or any Elementor element that supports adding links.
Open a post in the Gutenberg editor. Select the text to which you want to apply the popup opening link.
Click the Link Ctrl+K tool.
Then press Ctrl+V to paste the link, keeping in mind that you would have previously copied the link with Ctrl+C.
Now, all that’s left is to click the Update button and test our popup opening link.
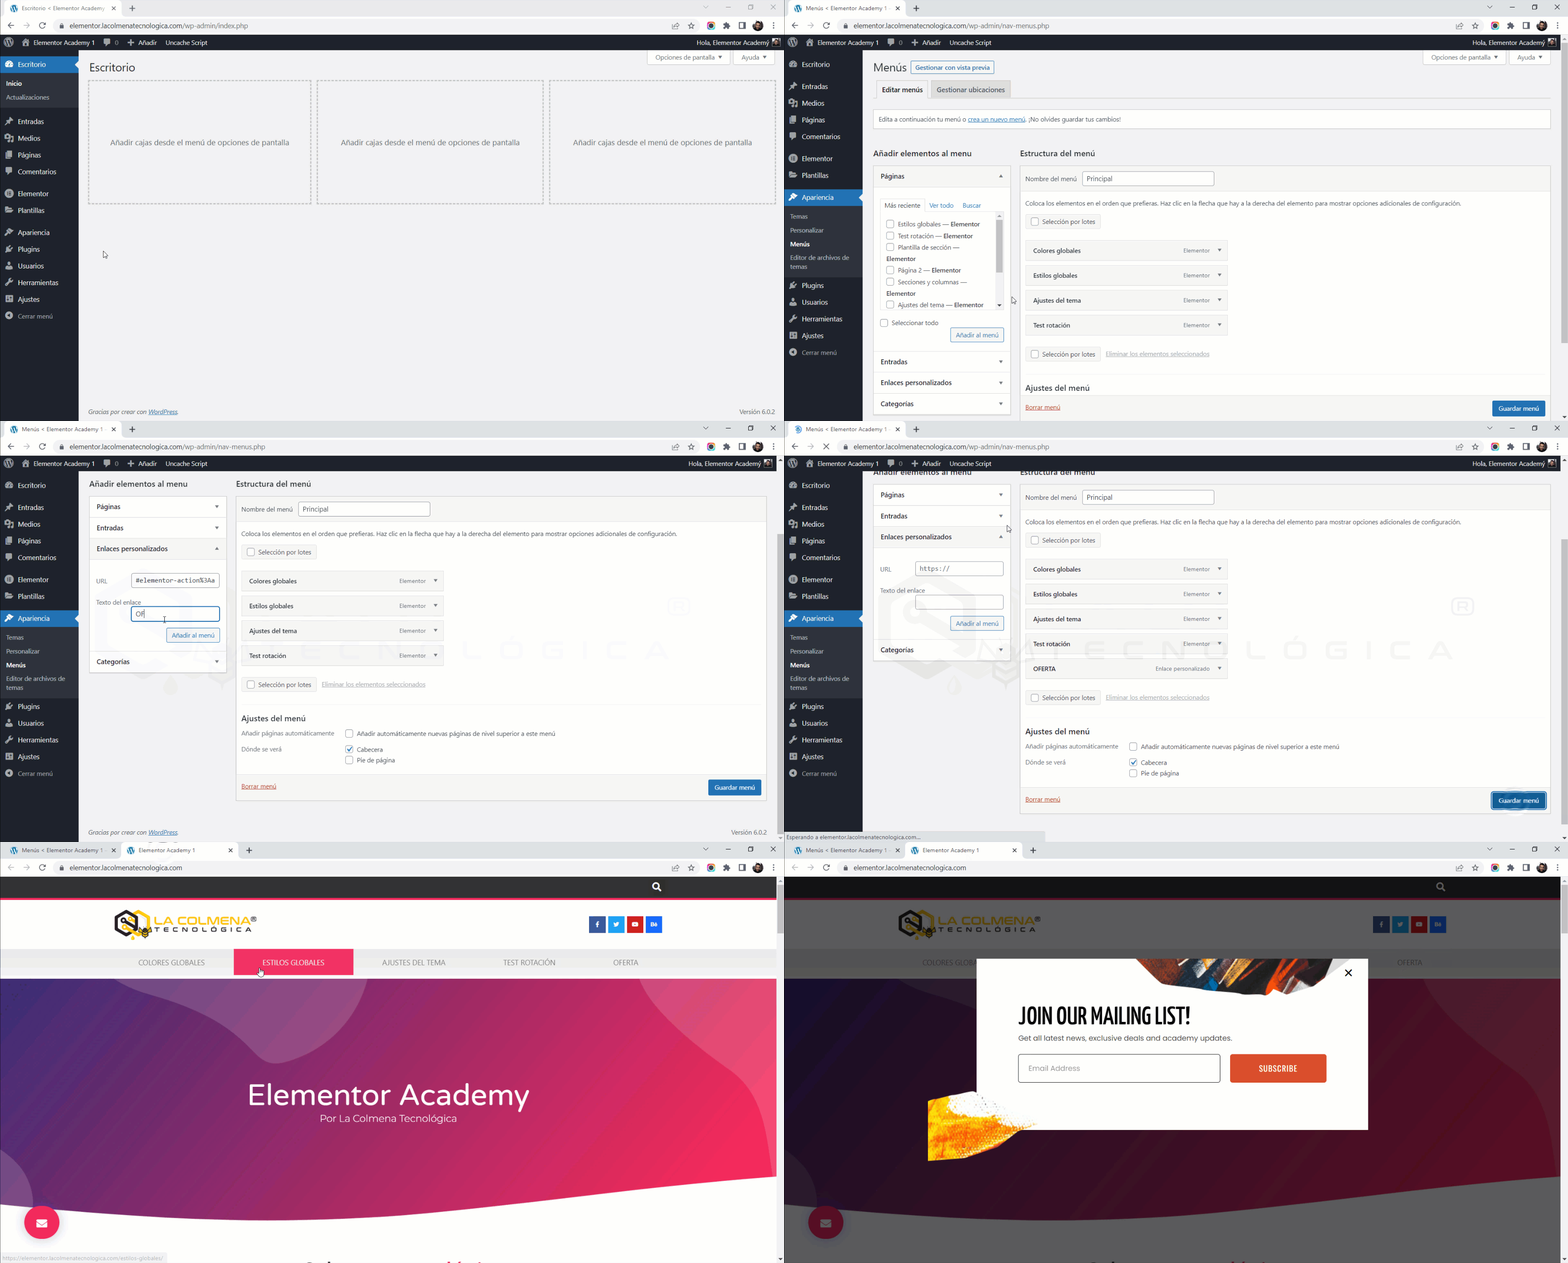
Apply Link in the WordPress Menu
Open the menu from Appearance > Menus.
Click the Custom Links dropdown and paste the popup’s internal link with Ctrl+V, then type a name in Link Text.
Finally, click the Save Menu button.
Now you know how to apply the popup opening link anywhere on your website.
“It’s not working, my popup isn’t appearing”
Check if the popup can be activated via Elementor’s dynamic action link. If it doesn’t activate, then there must be something wrong with your popup’s settings, not the activation URL.
Make sure you have correctly configured the popup’s “Display Conditions“. Otherwise, your popup will not appear.
Make sure you have correctly copied the activation URL into your link.
Check for a JavaScript error that might be caused by other plugins (check your browser’s Developer Tools > Console).
If you haven’t configured your own link, the activation URL only works with the <a> tag. To activate the open trigger, Elementor uses JavaScript code that only detects the link in the <a> tag.



 gear icon in the bottom left corner.