

Understand your website’s security notices and find out what to check first. Choose OpenAI or Claude, connect your account, and learn how to turn a report into a concrete next step.
A technical notice can leave you with more questions than answers: Is it serious? Should I touch anything? Could I break the site? The AI advisor helps interpret Security Ninja results. You retain the final say over any changes.
This guide covers the built-in advisor. Follow these steps if your WordPress shows “Security Advisor AI” and the screen heading “AI Security Advisor”. If “Connected AI tools (MCP)” appears instead, use the documentation linked below: that connection follows a different procedure.
Before you start: check which screen you have
Open Security Ninja in the WordPress menu and look for Security Advisor AI. The WordPress screenshots in this guide were taken with the user interface set to English. OpenAI’s form is shown as it appears in the provider’s platform; the sample key name can be replaced with a name of your choice.
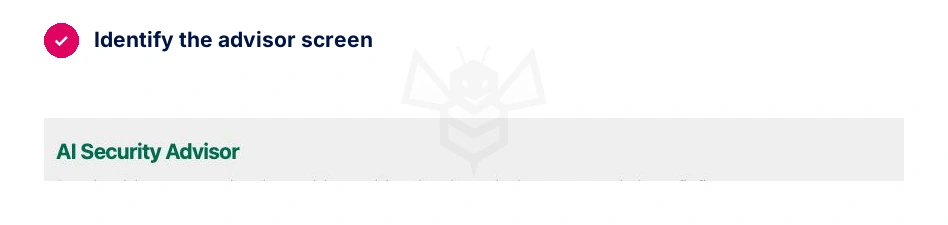
If Connected AI tools (MCP) appears and there is no advisor, you are looking at a different workflow: connecting to an external AI application. Do not reinstall an older version to replicate these screenshots. Check the documentation for that connection and stop this procedure here.
You can click any image to enlarge it and close it to return to the same step.
What you need
- Administrator access to your WordPress site.
- Security Ninja installed and active, with the built-in advisor visible.
- A recent backup before applying any security changes.
- An account with your chosen provider—OpenAI or Anthropic for Claude—with API access and available credit or active billing.
An API is the connection that allows WordPress to request a response from the chosen provider. An API key is the private credential that authorizes that connection. It is not the password you use to log in to ChatGPT or Claude.
API billing and ChatGPT billing are managed separately. Check your account balance and terms; do not assume that your subscription covers these queries. OpenAI billing information.
If La Colmena has already installed and activated your license, this part is done from your WordPress dashboard and your own AI provider account. You do not need to log in to La Colmena’s vendor account. Whether you purchased the plugin as a standalone product or as an add-on does not change these steps.
1. Open the security advisor
In the left-hand menu, go to Security Ninja → Security Advisor AI.
If this is your first time, you will see that there is no report yet and the button to generate one is disabled. That is normal: the provider still needs to be connected.
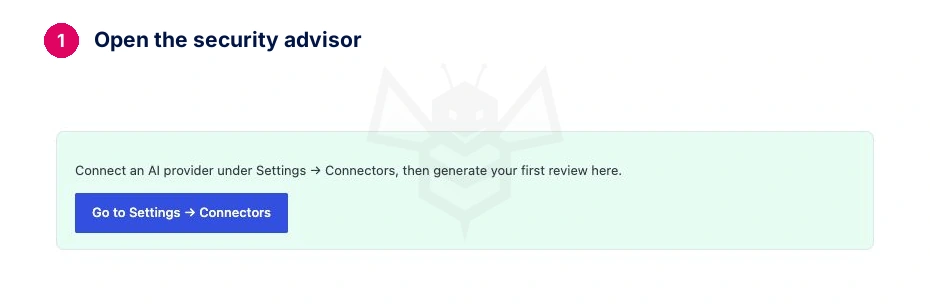
Check: the heading reads “AI Security Advisor”. You are in the advisor, rather than the plugin’s initial setup wizard.
2. Go to Settings → Connectors
Click Go to Settings → Connectors inside the advisor. You can also open Settings → Connectors from the WordPress menu.
This screen gathers WordPress AI connections. You can also use Claude via the Anthropic connector. Anthropic is the company behind Claude: that is the name to look for on this screen. The official WordPress connector allows you to use their text models.
Choose just one provider to start with. Below you have two dropdowns: OpenAI, with screenshots, and Claude, with text instructions. OpenAI is the provider used to verify the full walkthrough.
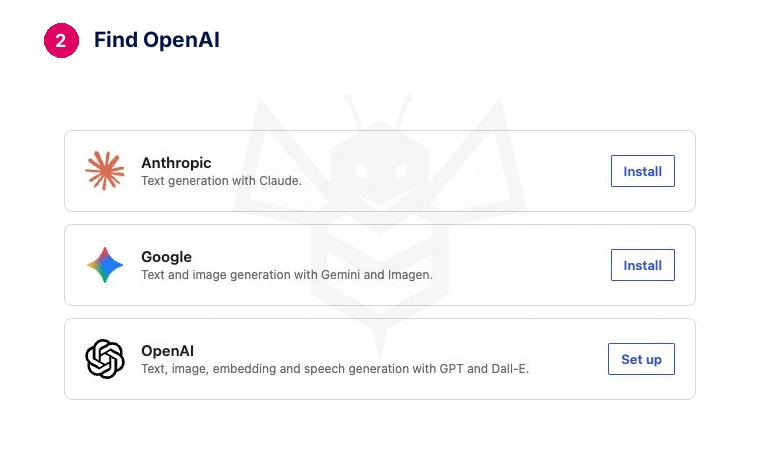
Check: make sure you find the card for OpenAI or Anthropic, depending on your choice. You do not need to install every provider.
3–6. Connect OpenAI or Claude
Open your preferred option and complete its four steps: install the connector, create the key, save it in WordPress, and test the connection. Afterward, both paths continue at step 7.
OpenAI · Steps 3–6 with real screenshots
3. Install the OpenAI connector
On the OpenAI card, click Install if the connector is not installed yet. Wait for installation to finish. If it is already installed, click Set up, as shown in the screenshot.
The API Key field opens so that you can save your own connection. The screenshot deliberately shows an empty field.
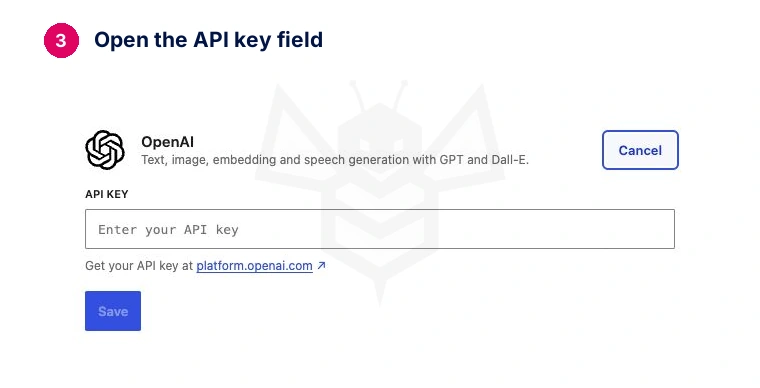
Check: the field to enter the key appears, as shown in the image. Do not enter your ChatGPT password there.
4. Create your API key in OpenAI
Open OpenAI API Keys and log in. This is the API platform; ChatGPT subscriptions and API usage are billed separately.
4.1. Open the form and name the key
- Make sure you are in the organization and project you want to use for this site.
- Click Create new secret key.
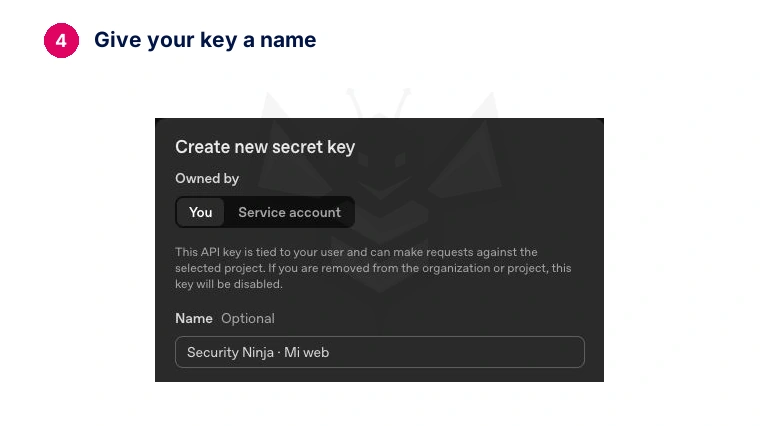
- For a personal connection like the one in this example, leave Owned by → You. Under Name, enter an identifiable name, for example Security Ninja · My Site.
- Check the Project field. Naming the key helps identify it, but on its own, it does not restrict where it can be used.
4.2. Choose expiration and restrict permissions
Under Expiration, choose how long the key should remain valid. One day is suitable for a short trial. For ongoing use, choose a duration you can manage and note the renewal date: once the key expires, the connection stops working.
Under Permissions, choose Restricted. This allows you to grant the specific access levels used in this example.
Configure these three settings. To view the last two, expand Model capabilities. Leave all other options set to None.
| OpenAI Setting | Permission used in testing |
|---|---|
| List models | Read — view the list of models |
| Model capabilities → Responses | Write — generate responses |
| Model capabilities → Chat completions | Request — request text completions |
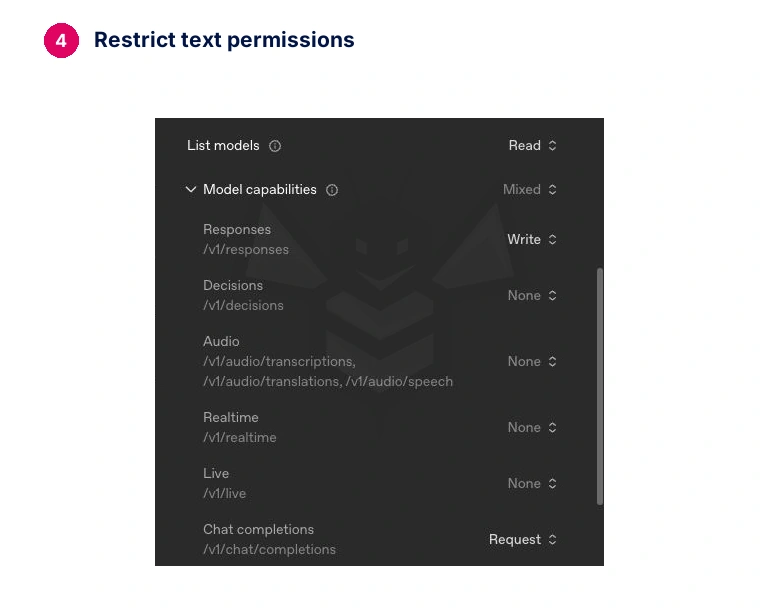
These permissions were verified using the lab connector; an update might change what it requires. If a permissions error appears, review the message before expanding access. Refer to the OpenAI guide on projects and keys.
4.3. Create the key and copy it securely
- Review the name, project, expiration, and permissions. Click Create secret key.
- Copy the full key that appears. OpenAI only displays it once upon creation; keep a copy in a password manager if you need to retrieve it later.
- Return to WordPress and continue with step 5. Do not paste the key into a chat, email, or screenshot.
The images stop before generating the secret key. They display the actual form controls without exposing keys, account IDs, or billing details. No additional credential was created to capture them.
Also check your project’s spending limits: an alert notifies you, but does not necessarily halt requests. Check your usage and spending limits.
Check: you have a private key, you know which project it belongs to, and you have reviewed how its usage will be billed.
5. Paste the key and save the connection
Go back to Settings → Connectors → OpenAI. Paste the key into API Key and click Save.
WordPress notes that credentials on this screen are shared among plugins using its connectors. Do not treat this key as exclusive to Security Ninja: keep only the trusted plugins you need.
Check: OpenAI displays as connected without validation errors. If the screen rejects the key, consult the troubleshooting section before continuing.
6. Select OpenAI in the advisor
Return to Security Ninja → Security Advisor AI and locate AI connection.
Select OpenAI under AI connector and click Save Changes. Then click Test connection and wait for the response.
A valid connection indicates that the provider responds. It does not yet prove that a report exists or that your site is properly secured.
Check: “OpenAI is ready to use” appears and the advisor retains OpenAI after saving. At the top, “Automatic review is off” confirms that automated reviews are disabled.
Claude · Anthropic · Steps 3–6 in text
3. Install the Anthropic connector
In Settings → Connectors, find Anthropic and click Install. Anthropic is the provider behind the Claude models. Wait for the installation to finish and for the API key settings to appear.
Do not install OpenAI if you plan to follow this path. Anthropic support is present in the lab advisor, and the official WordPress connector allows you to generate text with Claude.
4. Create your Claude API key
- Go to the Claude Console and log in or create an account. Simply having the chat app open is not enough.
- Review API billing and your available balance. A Claude subscription does not cover this usage: it is billed separately.
- Open API keys and click Create key.
- Enter an identifiable name, such as Security Ninja · My Site. Choose the expiration and review Linked account: for a personal test, select your own account.
- Select the Workspace you want to link it to. A key linked to that workspace avoids needing an extra identifier that the connector would otherwise have to send.
- Confirm key creation and copy the complete key to a secure location. It is only shown once. Do not email the key or include it in screenshots.
Control names may vary. The official key creation guide explains account types, expiration, and workspaces. If you cannot create one, check your permissions with your account administrator.
5. Save the key in WordPress
Return to Settings → Connectors → Anthropic. Paste your Claude key into API Key and click Save. Make sure the connection becomes available without any validation errors.
An OpenAI key or your Claude chat password will not work here. Connectors credentials are shared across plugins using this WordPress system: keep only the trusted plugins you need.
6. Select Anthropic in the advisor
Return to Security Ninja → Security Advisor AI. Under AI connection, choose Anthropic as the connector, save your changes and click Test connection.
Check: the provider remains selected and the test confirms it is responding. Then continue with step 7. Keep automatic reports disabled until you have checked your first result and its cost.
What was verified: these steps are based on Claude’s documentation and the compatibility of the installed advisor. No report was generated with Claude in this testing lab; the screenshots, report, and measured cost in this guide correspond to OpenAI.
The remaining steps apply to both providers. The full trial was performed with OpenAI. The WordPress controls were captured again in English after the temporary key was revoked; the guide explains the saved trial results in English. Claude responses and costs may differ.
7. Provide the advisor with fresh results
Open Security Ninja. Check when the scans you want the AI to interpret were last run.
First: Tests
Open Tests, click Run Tests and wait for the results to update.
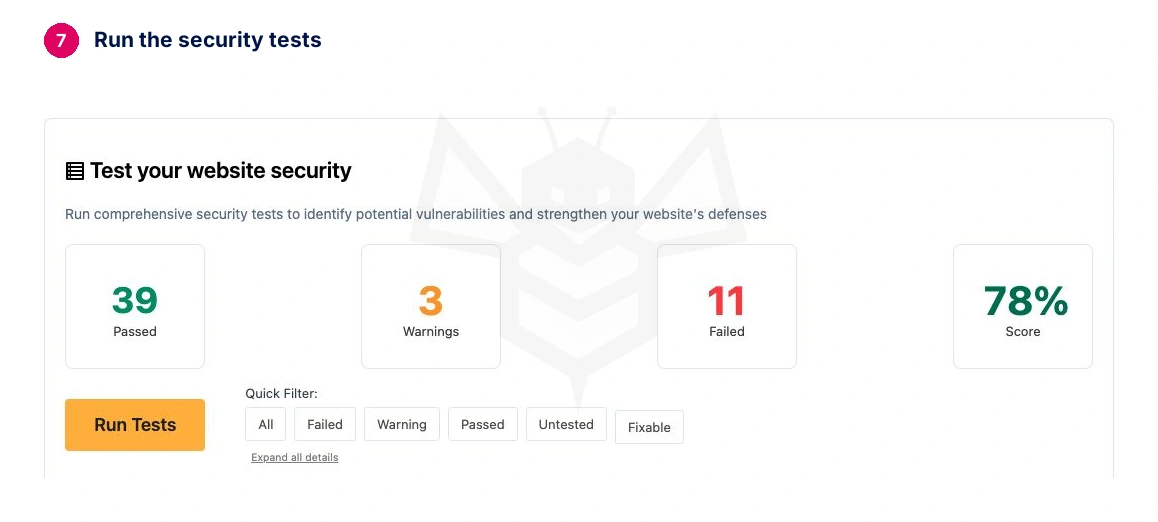
The score serves as a general guide. A score of 78% does not mean the site is 78% secure; you need to see which tests failed and evaluate their severity.
Next: Vulnerabilities
Open Vulnerabilities. To refresh the scan, scroll down to Run manual scan and click it. Wait for confirmation and check how many components were scanned.
Now: Core Scanner
Open Core Scanner, click Scan Core Files and wait for completion. This scan compares WordPress files against their official references.
You do not need to fix everything before asking for an explanation. You do need to distinguish between a completed scan and one that hasn’t run. A scanner with no available results is not the same as a clean site.
The advisor relies on saved results. If you have updated a plugin, modified a file, or adjusted a protection setting, rerun the corresponding scan so the explanation reflects the updated state.
Check: scans have completed and their timestamps make sense. Note any module lacking data so you can ensure the AI acknowledges that limitation.
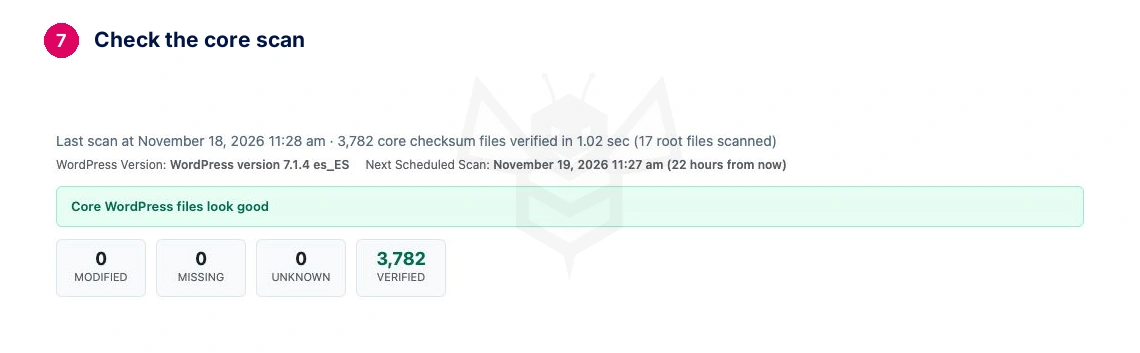
In this lab scan, 3,782 core files were verified without detecting modifications, missing items, or unknown files. This result applies strictly to the core; it does not replace malware scanning or certify the entire site on its own.
Finally: Malware
Open Malware and click Scan your website. Wait for the final result; do not mistake scan progress for completion.
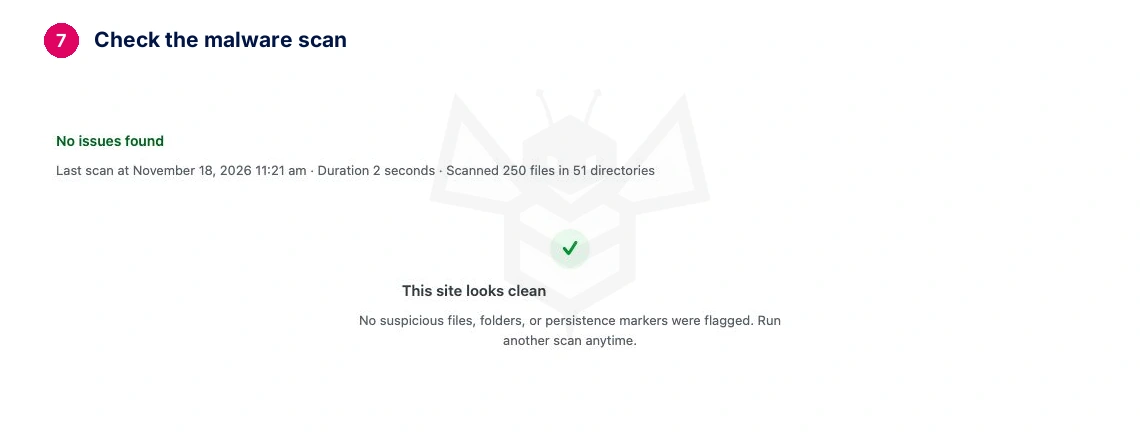
In our test, it finished without flagging any suspicious items. The scope covered 250 files across 51 directories; this is not presented as an absolute guarantee of safety.
8. Review what information will be sent
Return to the advisor and open Preview data sent to AI before generating the report.
The trial preview included test results, vulnerability and malware summaries, protection status and activity counts, with roughly 7.3 KB of context. The image shows an unaltered excerpt of those technical fields; their names remain in English.
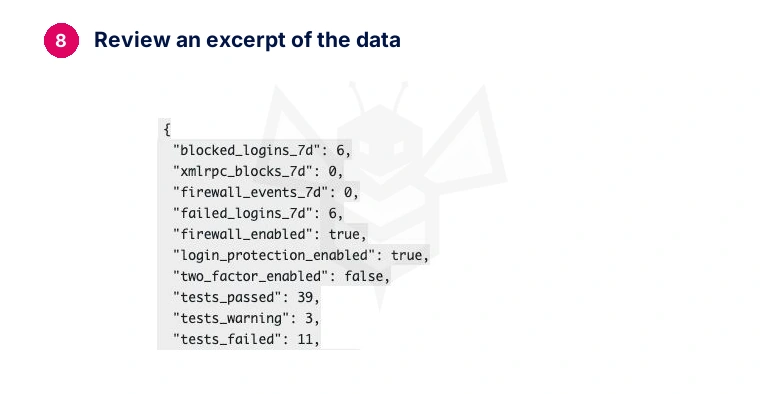
Review the summary even if the plugin states “No personal data is sent.” In the lab, the server path was replaced with [WP_ROOT], but the content still contained the test username and links featuring the website domain. We cannot describe it as completely anonymous.
The screen may show technical terms enclosed in curly braces. You do not need to understand every line: look for data you would rather not share and confirm that it consists of security scan results. If unexpected private information appears, stop the submission and check your settings.
Check: make sure you are comfortable sharing this summary with your chosen provider—OpenAI or Anthropic. This review applies to the built-in advisor and should not be extrapolated to other connections or versions.
Close the preview to return to the advisor. Opening this window lets you inspect the data; requesting the report occurs in the next step.
9. Generate your first report
Click Generate your first review once. Wait for the result to appear.
Start with a manual request. Leave automated reviews for after you have verified the report’s usefulness and cost. The security scan scheduler and AI report generation are separate features.
Check: a new report has been saved. A screen that keeps loading or an error message does not count as a completed review.
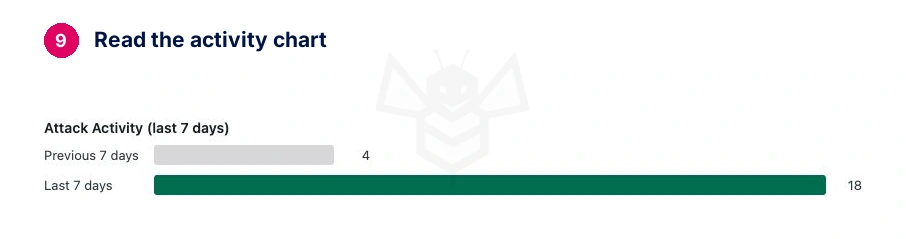
The trial report’s top recommendation was to strengthen administrator access using 2FA: a second verification step alongside the password. It was generated in Spanish and remained available after reloading. The screenshot shows the native activity chart in English; its counts reflect the later capture and can change as new events are recorded.
The header may take a moment to update after generating. If you can already see the report, refresh the page to confirm it has been saved before clicking again. The button changes to Generate a new review now.
10. Turn the report into a simple decision
Start with the top priority. Look for three answers: what was detected, why it matters, and how to verify it.
Open the corresponding original Security Ninja result. If the report mentions an unknown file, find that file in Core Scanner; if it flags a vulnerability, check which component and version the scanner identifies.
Example of criteria, not diagnosis: an unknown file simply means it does not belong to the official WordPress package. On its own, that does not prove it is malware. Before deleting it, you must identify its source and purpose.
A helpful report also admits what it does not know. If a scan is missing, the data is outdated, or the summary contradicts the original scan, address that limitation before taking action.
A real example: the file editor
The report recommended disabling the dashboard file editor. The original test also indicated that it was enabled. To check the reasoning, open Tests, find Check if plugins/themes file editor is enabled. and click Details. The screenshot shows the opening explanation of that original test.
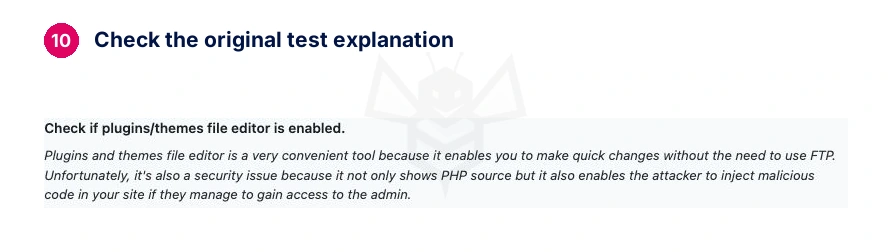
That does not mean the change has been made. Nor does it refer to the visual page builder: it refers to the tool used to edit code files. Before applying a fix, identify its impact, keep a backup, and verify the outcome afterward.
And an example of why you should cross-check
Core Scanner had verified 3,782 files. However, the summary received by the AI listed zero files counted as correct. The response warned about this missing data. The zero in the summary did not prove that the scan had not been run. The original scanner screen cleared up the confusion.
Check: you can explain a finding and your planned next step in your own words. You do not need to resolve everything all at once.
11. Drill down into a single recommendation
Scroll to Follow-ups and choose What should I fix first? from the guided questions shown below. Wait for the response, then open More detail to read the proposed steps.

During testing, the follow-up explained why it prioritized 2FA and suggested verifying access without closing the current session. It also suggested scheduling scans, even though they were already scheduled. That part needed correction when cross-referenced with Scheduler.
Use this rule of thumb to evaluate the explanation: “What result supports this recommendation? What should I check before changing it? How will I know afterward that it worked?”.
These questions serve as a reading guide. The tested advisor provides guided prompt buttons rather than an open box to write arbitrary instructions. Each additional query may consume API credits.
Check: the response references your data and distinguishes a recommendation from a change already implemented.
12. Check usage and decide when to repeat
Open the usage dashboard in your OpenAI project. Filter by the test period and, when available, by key and model. If you use the same account for multiple tools, do not attribute all expenses to Security Ninja. View usage and costs.
Tokens are the units of text processed by the model. Cost depends, among other factors, on how much text it receives, how much it generates, and the model used. The plugin’s estimated counter does not replace the usage billed by the provider.
There is no fixed cost that applies to every website. Record the model, date, queries run, and observed cost. If it does not appear in the dashboard yet, leave the measurement pending rather than assuming it was free.
What this test recorded
On November 18, 2026, the dedicated key logged two queries—one report and one follow-up—with an indicated cost of $0.11. The usage dashboard showed 6,655 input tokens and 1,207 output tokens. The report identified the gpt-6.2-astra model, chosen automatically by the connector.
This is an observation from a single test, not a fixed price or a representative average. The general chart and the table by key updated at different times; the key row was used as the baseline and later cross-referenced with its monthly spend. It is not presented as a final invoice.
The tested screen does not provide a model selector. An update to the connector may change the model selection and cost. To compare, always measure the same task; check current OpenAI pricing if you need to calculate an estimate.
Repeat the review whenever you update scans or make a significant change. If you want to schedule it, review the frequency and budget first; you do not need daily checks to complete this setup.
Check: you know where to check your spending and you have a clear reason for the next review.
If this was only a test: revoke the temporary key when you finish. In our lab, the saved credential was revoked and removed; automatic reports were not enabled. To continue using the advisor on your site, you need to maintain a valid connection of your own and monitor its usage.
If you chose Claude, check Usage and Cost in its console and review the workspace for this connection. You can review the usage controls and workspace limits. The amount from the OpenAI example is not a Claude rate.
Troubleshooting
I cannot find the advisor
Check your version and the menu. If you see Connected AI tools (MCP), do not follow the built-in advisor workflow. An update may have changed how the AI connects.
The generate button is still disabled
Return to Connectors, verify your chosen provider, and go back to the advisor. Ensure the provider is selected and saved. Installing the connector without a valid key does not complete the connection.
The key does not work
Make sure you copied the complete key from the correct project and that it is still valid. Do not post the key value when asking for help. If it has been exposed, revoke it and create another.
A quota or billing error appears
Check the error code and your provider’s dashboard. You may be out of credits, have reached a spending limit, or encountered a rate limit. These are not the same issue; clicking repeatedly will not resolve them.
The response is incomplete or does not match the scanner
Check the date and scope of the scans. If there is a connection or provider error, keep the error message without exposing secrets. If the AI misinterprets a finding, use the original result as your baseline and request a technical review before applying changes.
How do you know you are done?
- The chosen provider is connected and selected in the advisor.
- The scans feeding the report are up to date.
- You have reviewed what information leaves your site.
- The first report has been generated and saved.
- You have cross-checked a recommendation against the original scanner.
- You know where to monitor usage and which automations remain active.
The value lies in understanding your site better and making an informed decision. AI assists that work; updates, backups, and reviewing changes are still essential.